How to make a DIY potrack made from pipes purchased from a home supply store.
Last weekend my wonderful husband and I installed this beautiful pot rack in my kitchen.

We appreciate you
This post may contain affiliate links. Life Currents participates in different affiliate programs. As an Amazon Associate I earn from qualifying purchases. For more information see here.
I didn’t even realize that I still had that pretty copper pan or the copper bowl anymore!
How we decided to make this potrack
I had a large empty wall on one side of my kitchen.
Well, the oven opens onto that wall. And, the door to the garage opens onto that wall as well. So, it isn’t like it’s the most useful wall ever.
In fact, it’s sat empty for many years.It wasn’t until we went to a friend’s party and I looked in their kitchen that I got that idea to do something with that wall.
My friend lived in a small apartment and had taken those {affiliate link} 3M Command Hooks and hung the pots from those.
I instantly fell in love (besides, you know I love those Command hooks).
I pointed it out to my husband and asked if he was cool with that in our kitchen. He liked the idea, but thought we could do better. He set to work thinking about a solution.

Pipes from home supply store
Skip ahead many weeks and we’ve been making some tables (I’ll post pics soon) for the house and we decided to build the table bases out of pipes from Home Depot.
If I had a dollar for every person who asked us what we were going to do with all those pipes, I’d be a rich woman, or at least I’d be able to pay for the pipes.
Pot rack
Note: this section contains affiliate links
Then, inspiration struck (I’m pretty sure it was Dan’s idea), we figured that we loved the idea of the pot rack matching the coffee table base in the living room. Love the idea!
So, it only took us a few hours to hop over to Home Depot, gather up all the parts, put them together, seal them with a spray sealant, and install them.
If you want to do something similar, you’ll want to measure where the studs are in the wall first.
The main pipe length was based on that measurement. Ours was 32 inches between studs.
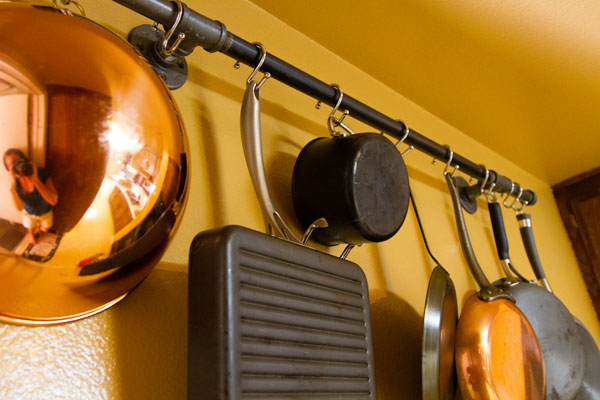
There are two “T” fittings on each end of the main pipe.
There is a 1 1/2-inch nipple on each of the “T”s, and that attaches to the flange.
The flange is screwed into the studs in the wall using dry wall screws.All the pipes are black & 1 1/2-inch diameter.We extended the length of the pot rack by adding 6-inch pipes to each side and capped those off.
This gives me a little more flexibility and makes the pot rack look more finished. Make sure your pot rack is level when you hang it, or the pots may slide to one side.
I already had the “S” hooks in the house. So, I gathered those up and used those to hang the pans from the rack. In fact, the diameter of the pipes was partially based on the “S” hooks that I had, because you want to make sure that the hook fits over the pipe easily.
Collect those pots and pans for the rack
I’m still gathering up which pots and pans to hang from the rack. But, that means I get to organize the kitchen a little bit more. Yippie!
That’s it!
Pretty easy and quick to do. It was done in one day! Thanks so much Dan! I love it!

The flanges attach to the wall into the studs. From there, the “legs” of the pot rack attach to the main large pipe.
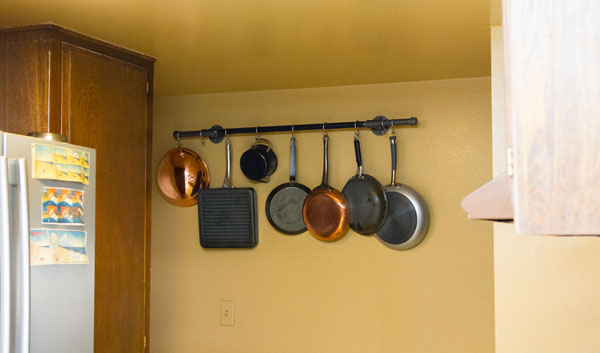
This shot gives a little context to my kitchen. I love the use of vertical space!
Questions
Updates: I’ve gotten a couple of questions on the pot rack, so I thought I’d update the answers here as well.
“Can we get a close up of your hooks? Do they have a name?”
Answer: They’re “S” hooks that I bought at Target. You can probably find them in the shower curtain area. I recommend making sure that they’re sturdy hooks before buying them.
A quick look on Amazon for S hooks, and I see all kinds of different sturdiness (meaning how thick the metal is), and I’d be concerned about some of them that they might bend and the pot would fall off (depending on how heavy the pot is, like with a cast iron skillet).


Close up on the ‘S’ hooks on the pot rack. I also like that you can see the floor flange in the back, which brings me to the next question.
What kind of brackets did you attach the pipe to?”
Answer: We used floor flanges to attach the pipe to the wall. You’ll find the floor flanges in the same area of the home improvement store that you find the pipes in.
I have more detailed instructions above on how we hung them.
Let’s connect
If you like seeing my recipes subscribe via email in the upper right.
Or, connect with me on your favorite social media channel for recipes, photos, & much more:
Pinterest, Facebook, Instagram, YouTube and Twitter!
And find my shop on Amazon for recommendations on cool tools


Erin
Great idea! Using the pipe is genius!
Crystelle
What a great idea! It looks great, and I bet it is super sturdy!
Peggy
What a wonderful idea! Definitely will keep it in mind when we’re looking for a new house next year =)
Katherines Corner
Great idea, and industrial chic too. Thank you for sharing at the Thursday Favorite Things blog hop. Wishing you a beautiful weekend xo
Michelle Day
Love it! Totally ingenious. Thanks so much for linking up to Creative Thursday. Can’t wait to see what you share this week! Have a wonderful week.
Michelle
Val
Great idea! Love how this lends an industrial look to your kitchen!
Val