This post may contain affiliate links. If you make a purchase through links on our site, we may earn a commission.
An adorable and easy holiday project you can make with your family. Then use these festive Peanut Butter Cup Christmas Trees as decorations or a centerpiece on the holiday table.
These Reeses peanut butter trees are a fun 3 dimensional decorated treat that the whole family will love. Not only are they fun and easy to make, but because they’re made with the classic combination of peanut butter and chocolate, they’re delicious too!

We appreciate your support
Please let me know if you have any questions about this recipe. I read all the comments myself and I try to help as soon as I can. I have readers from all levels of comfort and experience in the kitchen on my site, and I’ve tried to answer some of your questions already in the post. But if I’ve missed anything, please feel free to leave a comment and ask.

I first saw these little Reese’s trees here. But after seeing them once, I saw these peanut butter Christmas trees many times on Pinterest, even once from a magazine. But, I’m crediting where I saw them first.
Handmade gift giving
These little trees make great gifts.
Grab a plastic bag, tie it all up with a pretty ribbon, and you have a fun gift for a teacher or a family member.
Take one as a hostess gift.
Give them out as party favors.
Use them as place setting on the holiday table. Add a little card in front of each tree with the person’s name on it so they know where to sit.
Give them to Santa in place of cookies.
Take home first prize in the cookie tray contest because these are so cute!
And, give these cute white chocolate dipped rice Krispie treats a try!

Did you know that Reese’s came in lots of sizes?
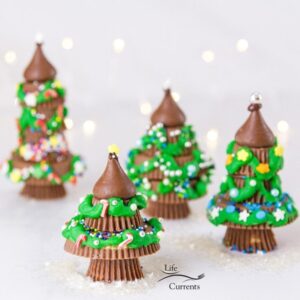
The basic peanut butter cup Christmas tree has two sizes of Reese’s. The miniature size and the regular or standard sized ones. All topped with a kiss. And, of course those cute decorations.
We made several shapes of the trees using just those two sizes of Reese’s cups.
My recipe card below has the basic tree instructions, feel free to grow your forest in any size and shape you want.
I’ve also seen snack sized Reese’s and thin Reese’s at the store too.
And I think if you had a big group of people all crafting these together, it would be so fun to see all the different shapes of trees that can be made.
Tall skinny trees.
Short squatty trees.
Elegant trees.
Charlie Brown trees, maybe?
They also make dark chocolate Reese’s peanut butter cups. Oh you know I wanted to make some trees with those!
But I stuck with the standard milk chocolate for my first go around making these trees. But, oh how fancy the dark chocolate ones would be!

What decorations should I use?
Grab any cookie or cake decorations you have. Like jimmies, sparkles, stars, dragees, sugar pearls in different colors.
As you can see, we had all kinds of colors and styles of sprinkles and decorations to choose from.
Take a look below for links to Amazon to grab some of these fun decorations.

What icing should I use?
I just went with a store-bought tube of icing for my decorations.
You could melt colored candy melts as well and place the melted candy in ziptop bags. Then cut a corner off of the bag and use it for piping.
Go fancy with decorator tips if you want.
Or, make your own royal icing, here’s a recipe to make some if you want to go that route.
Any color icing will work too. I went with green for a pine tree look and like it’s a garland.
White can look like snow.
You could do red on some layers and green on others.
Each type or brand of icing will have a different sticky-ness to it (meaning how much the sprinkles will stick to the icing).
My icing wasn’t super sticky, so I ended up actually lightly dipping or rolling the iced peanut butter cup in the sprinkles on some of the trees, and pressing the sprinkles in by hand on some of the trees.

Tips for making trees
Refrigerate the peanut butter cups for 10-15 minutes prior to working with them. This helps the paper peel off easier, and prevents damage to the peanut butter cup.
Let the cups come back to room temperature before building the trees or the icing will be difficult to pipe out onto them.
You can pipe the icing onto each layer of the Christmas trees before gluing them together (with melted chocolate) or after gluing them together. These will create different looks.
My trees were all decorated before gluing the layers together.
Use a rimmed baking sheet or individual disposable aluminum trays for each person making trees. This will catch all the sprinkles that will inevitably fall off as you decorate.
Line the rimmed baking sheet with parchment or waxed paper. You can use the parchment paper to pick up and pour the sprinkles back into their bottle if you want.
Have glasses or cups ready to stand up the icing tubes and melted chocolate zip top bags. (see photo below).
If you have large or unsteady hands you may want to use a tool to help you decorate your trees. Try toothpicks or tweezers.

Other cute and easy cookie ideas


Items you may want for these trees
Note: these are affiliate links
Sugar pearls (these come in all different colors too!)
Rimmed baking trays or disposable aluminum trays
Edible glitter (this is the “snow” around the base of the trees in my photos)
Ugly Xmas Sweater Sprinkles (these are all natural, with no soy, artificial dyes, palm oil, wax, or animal product)
Into the Woods sprinkles (these are all natural, with no soy, artificial dyes, palm oil, wax, or animal product)
Let’s Connect
If you like seeing my recipes subscribe via email in the upper right.
Or, connect with me on your favorite social media channel for recipes, photos, & much more:
Pinterest, Facebook, Instagram, YouTube and Twitter!
And find my shop on Amazon for recommendations on cool tools
If you try this recipe,
please come back & leave a comment below letting us know how it goes.
Share a picture & tag @lifecurrents on Instagram.
Or you can upload a “tried it” photo (I would love to see)
via the pin.

Recipe
Peanut Butter Cup Christmas Trees
Ingredients
- 2 Miniature Reese’s Peanut Butter Cups
- 1 Regular Reese’s Peanut Butter Cups
- 1 Hershey Kiss
- Chocolate chips for melting and using as glue
- Colored icing
- Sprinkles
Instructions
- Refrigerate the peanut butter cups for 15 minutes to chill. Unwrap the Reese’s peanut butter cups and the Hershey’s kiss. Allow candy to come back to room temperature.
- Melt the chocolate chips in 30-second increments in the microwave, stirring after each time. Place melted chocolate in a zip top bag, and cut a small tip off of one end.
- Each layer of the tree can be decorated before assembling the entire tree, or after assembling the tree. To decorate, pipe icing onto the outside of the peanut butter cup, and place or sprinkle decorations on the icing.
- Assemble the trees: Place a miniature peanut butter cup upside down on your work surface. Pipe a dot of melted chocolate on top and attach one upside down regular-size cup.
- Turn another miniature cup upside down and pipe another dot of melted chocolate to attach it to the top of the first two cups. Finally, attach a Kiss to the top with another dot of melted chocolate. Attach a star or topper of your choice to the top of the kiss with a dot of melted chocolate.
- Place trees in the fridge or in a cold area to allow the chocolate to set for about 30 minutes.
Nutrition
Nutritional information is based on third-party calculations, and should be considered estimates. Actual nutritional content will vary based on brands used, measuring methods, portion sizes, and more.


MICHAELA KENKEL
I wanted to come back and tell you how much fun my nieces and I had making these today!! So cute!! So happy i found them on your instagram account!
Michelle
Such a fun project! For the record, I actually saw them first when you posted them on Facebook. These are super cute and easy to make!
jennifer stewart
These trees are just about the cutest things I have seen in a while! I love that they are vertical and not flat! I can’t wait to start finding some cool sprinkles to decorate mine with!