This post may contain affiliate links. If you make a purchase through links on our site, we may earn a commission.
I’m very excited to bring you Dan’s (my wonderful husband) first official post (which includes Affiliate links) on Life Currents!
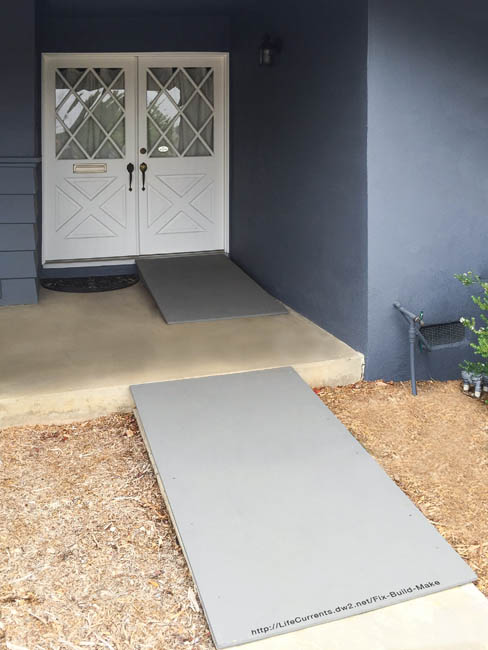
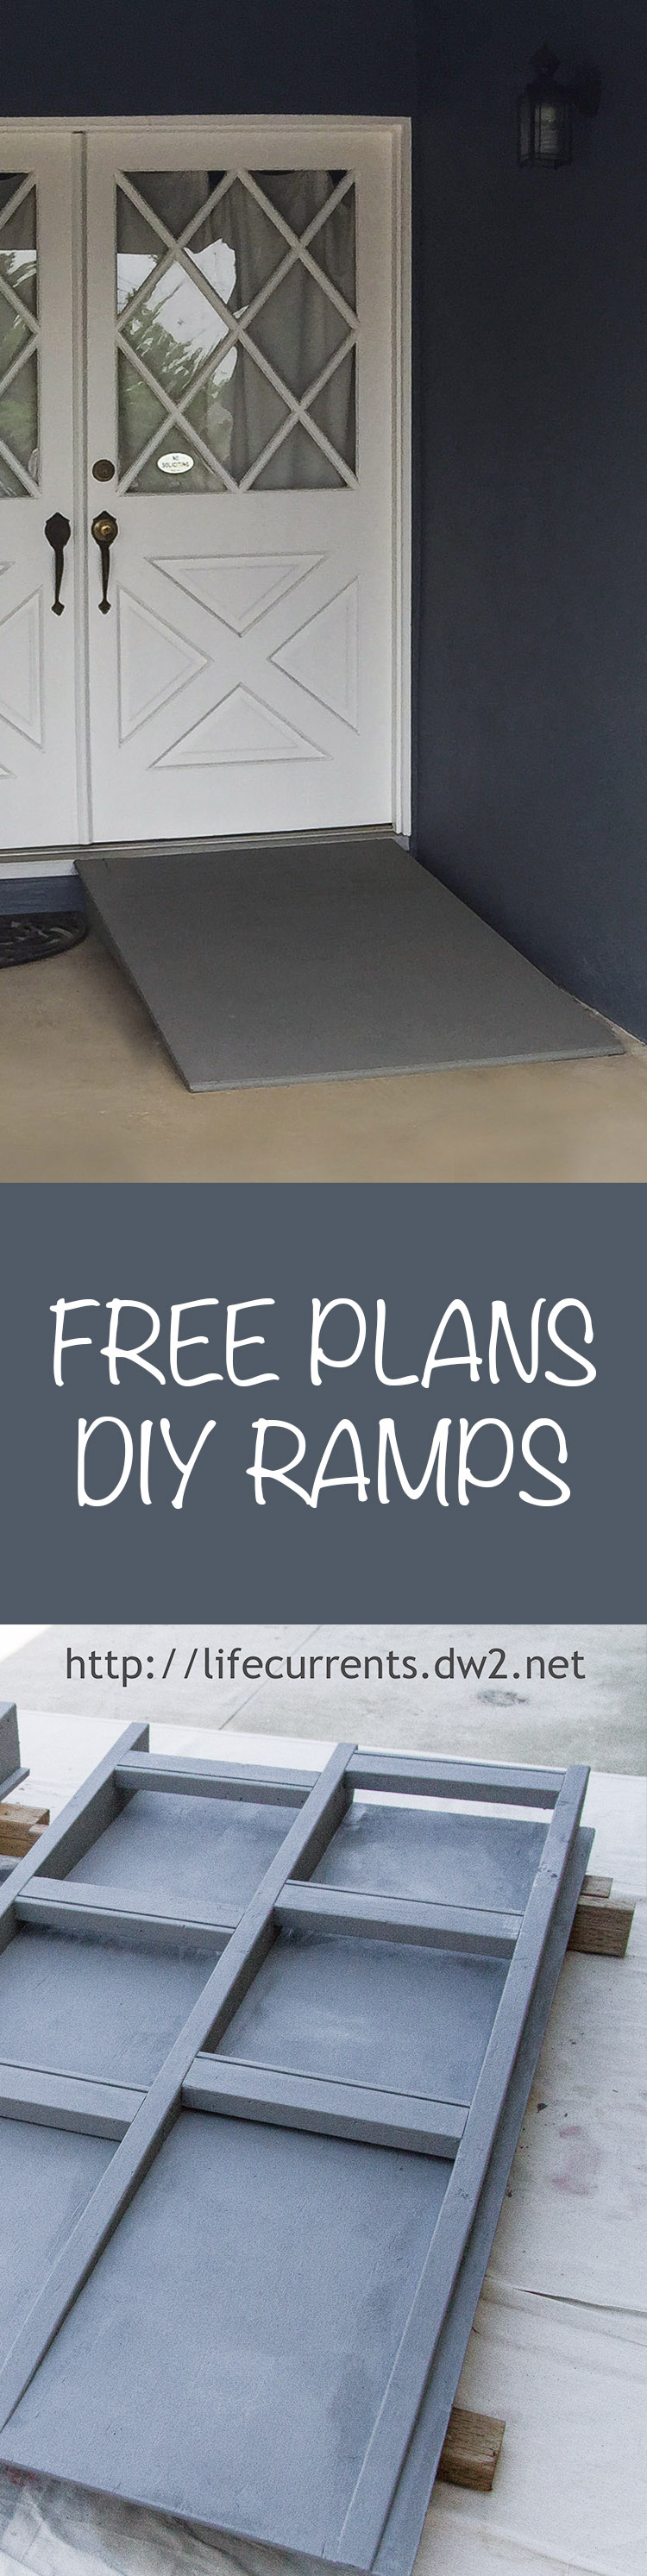
Wheelchair Accessible Ramps Post with Free Building Plans
Dan has been very involved with the blog in the past; you’ll remember some of his recipes like Dan’s World Famous Gumbo, Fried Rice, Braised Beef with Balsamic Roasted Tomatoes, and Brined & Roasted Chicken. We’ve also shared many of his projects including the original post for these Wheelchair Accessible Ramps, Lawn Dice, and DIY Pot Rack Made from Pipes.
You’ll find Fix Build Make on Instagram with all of his cool projects (and he’s really funny!).
This post is a follow up to the original Wheelchair Accessible Ramps post, but chock full of more details!
so without further ado…
Hey there, Dan here.
This is my first post so take it easy on me :).
Since the original ramps post was pretty popular, I thought I would update it. For your convenience, here’s a link to a PDF of the building plans.
If you’re an experienced builder and just want to see a quick overview of the structure and how the pieces come together, watch the video above or click here to watch it on YouTube.
This all started when we agreed to host several events in one year.
I have an Aunt that is wheelchair bound and that year a couple of other family members had knee replacement surgeries. They were still recovering from the surgeries so steps were difficult.
I use to borrow the ramps my dad made for his house but going back and forth was getting to be a hassle and the ramps were not an exact fit for our house anyway.
I found a 6 foot ramp online but it was $250, and that was for just one ramp! Maybe that makes sense if you need the ramp all the time but we only need them for a few days a year, so $500 is way out of our budget.
Instead, we made these ramps for less than $35 each plus paint. With that savings you have plenty of budget to add an edge railing for wheelchairs if you need them.
A SPECIAL CONSIDERATION FOR THIS BUILD:
All dimensions shown are for the ramps I needed. Your ramp (and therefore all of your cut sizes) WILL BE different based on the height of your step and the width of your walkway.
In the instructions I will describe how I arrived at my measurements so you can find your own measurements.
Lumber:
(1) 2 x 4 x 8 ft.
(2) 2 x 8 x 8 ft.
(1) 4 ft. x 8 ft. x 5/8 in. OSB or plywood
Hardware / Supplies:
(24) galvanized deck screws 3 inches long
(24) 1-5/8 inch wood screws
Paint or DeckOver
Tools I Used:
Circular Saw Saw Guide (any straight edge)
(2) Clamps
Chop Saw (optional)
Cordless Drill
Combination pilot hole / countersink bit
Chalk line (optional)
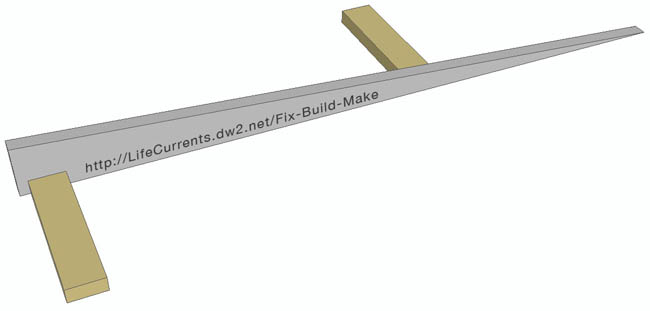
CUT LIST / DIAGRAM – adjust all measurements to your needs (click image to enlarge it)

A QUICK NOTE ABOUT MATERIAL SIZES:
If you are not familiar with buying lumber materials, be aware that the name of a product such as a 2×4 (pronounced “two by four”) is not the actual size of the product.
For example, while you might expect a 2×4 to measure 2 inches by 4 inches it will actually measure 1.5 inches by 3.5 inches. Even engineered products like plywood are not always exact. For this project I bought a sheet of plywood that was sold as 1/2 inch but actually measured 5/8 inch.
So when you are adjusting the measurements for your ramps be sure to take actual measurements of the products you are using.
METHODS OF WORK:
It’s always a good idea to pre-drill and counter sink all screws to prevent splitting the wood. This is especially true when working close to the edges or screwing into the edge, like you will be doing in this build.
The 3 slanted supports need to be as identical as possible so measure carefully and clamp a straight edge to the work piece and then run your saw along it. Go slowly and be careful not to swerve away from the guide.
It is very important that the spacers are cut to the exact same length.
Otherwise the sides of the ramp will bow out. If you use a chop saw it is easy to set up a stop block. Otherwise you can cut all the pieces 1/4 inch long and then clamp them together and cut them all to final length at the same time.
DETERMINE YOUR MEASUREMENTS
The first measurement you need is the height of your slanted supports.
To determine this take the height of your step (In my case it was 6 inches) and subtract the thickness of your ramp surface material (mine was 5/8 of an inch). So the height of my slants needed to be 5 3/8 inches. Then you need the length.
In my research I found a reference that said a comfortable slope for a wheelchair ramp is 1:12. Thankfully this keeps the math easy. To find the correct length of your slanted supports, convert the height of your step from inches to feet. So for my 6 inch step the base of my slanted supports needed to be 6 feet long. Now you can cut the 3 slanted supports.
Ok, now take a deep breath, this is the hardest part of the project, determining the correct length of the spacers. If you hate math, the diagram below explains it in a picture. While I love math, the diagram shows the way I actually did it so don’t be shy. The idea is that the width of the 3 slanted supports plus the 2 spacers ends up being 2 inches less than the width of your walkway.
To determine the length of the spacers you can take the width of your walkway, subtract the total width of all 3 slanted supports (just stack all three and take one measurement), divide that measurement in half and subtract 1 inch.
Honestly, even if you like math the diagram probably makes more sense.

Subtracting the additional inch from each spacer makes it so the base of your ramp sits 1 inch in from either side of the walkway. This ensures that they are solidly positioned even if the ramp is not laid down precisely.
The last piece you need to cut is the plywood top surface. The width should be the same as the width of your walkway and the length should be the same as the top slanted edge of the slanted supports. By cutting the top to the full width of the walkway it will overhang the edges of the slanted supports. This will give the whole piece a nice finished look and will also hide the slants in case they bow or curve a little.
Next up… Build it!
Start by attaching 2 spacers to one of the slanted supports by screwing through the slanted support and into the spacer using (2) 3 inch deck screws for each spacer.
Attach one of them almost all the way at the back (the tall side) but leave a small space. This space ensures that the finished ramp will push up flush to the step.
Attach the second spacer to the opposite side of the slant and as far forward as you can but make sure top of the spacer is below the top of the slant support.

Attach the next 2 spacers as shown, staggering them so you can screw through the slanted support.

Attach the last 2 spacers roughly half way between the others.

Align the remaining 2 slanted supports so they are flush with the tall end of the center support. The best way is to push them all up against the step where the ramp will be used. Screw from the outside edges into each of the spacers again using (2) of the 3 inch deck screws for each spacer.

Align the plywood surface so that it is flush with the tall end of the ramp making sure that the overhang is equal on each side and even all the way down the slants. If you cut the spacers precisely the overhang should be 1 inch on each side. It doesn’t matter if it is a little off as long as it is the same at the top and the bottom of the ramp.

Before you begin attaching the surface, hang one of your screws off the side and move it towards the front of the ramp until you have about half an inch between the end of the screw and the bottom of the slanted support.

Then draw that line across the top of the plywood parallel to the bottom of the ramp. When you are attaching the top this line will indicate the last place you should drive a screw. Don’t worry about the line, it will get covered when you paint the ramp.

Next, mark the center line of each slanted support on the back edge of the surface and continue that mark all the way down the top of the ramp until you get to the screw stop line you created. I used a chalk line but doesn’t really matter how you make the line.

The top is attached using the (24) 1-5/8 inch wood screws. Start attaching the top by driving the top left and top right screws first, being careful not to move the surface. Check alignment after each screw. Once these 2 are in the top shouldn’t go anywhere and you can work your way down each slanted support adding screws about every 6-8 inches until you reach the stop line.

Once you are done screwing on the top you are ready to paint it. We used a product called DeckOver which is meant for resurfacing old worn decks and keep them from splintering. It sounded just right for this project and it was. It ended up having a pretty rough texture which we like. It feels like a no-slip surface kind of like grip tape.


culinaryginger
Well done Dan! What a great post. You and Debi sure make a very talented team.