This post may contain affiliate links. If you make a purchase through links on our site, we may earn a commission.
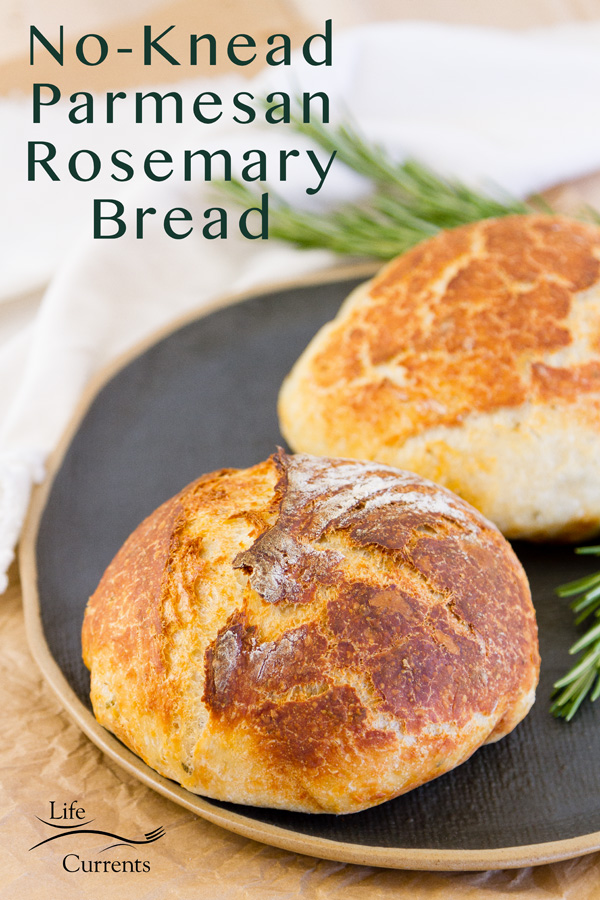
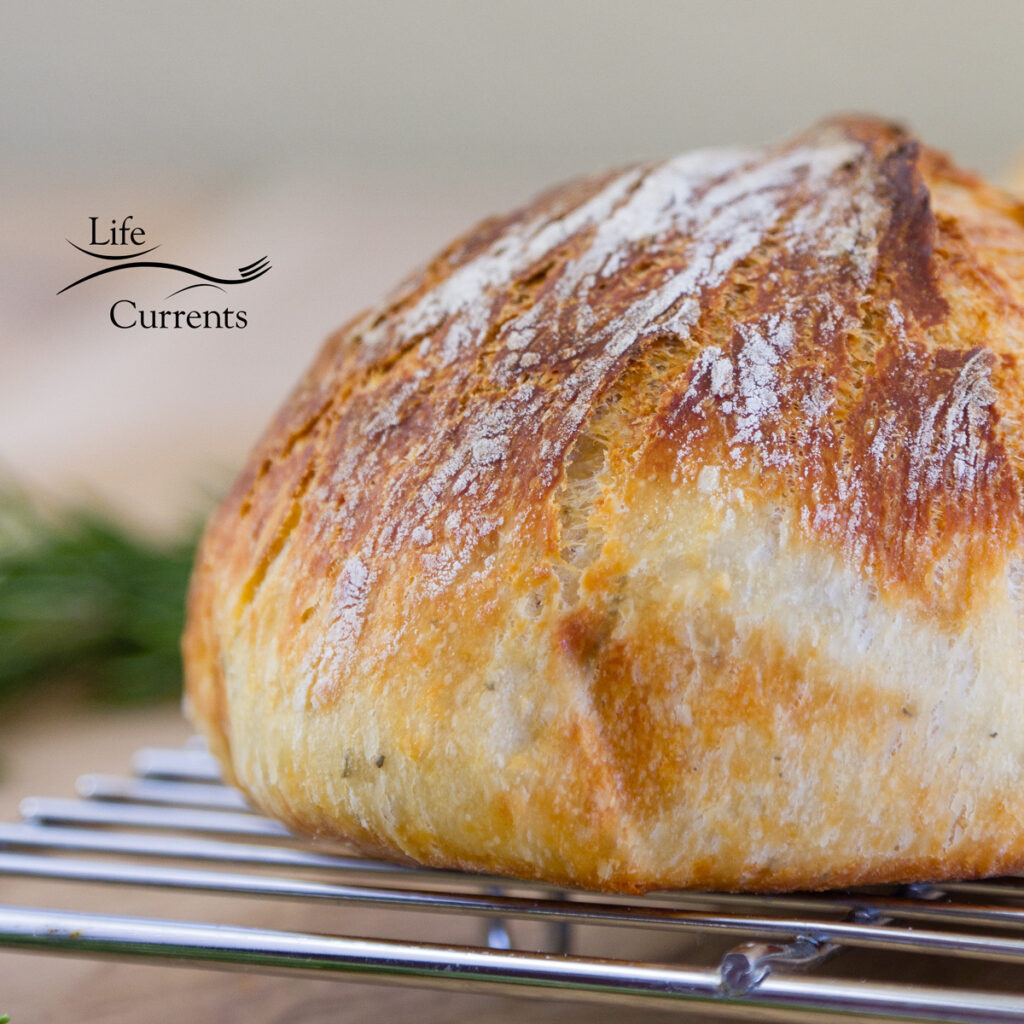
An easy to make, homemade artisan bread that will knock your socks off. This No-Knead Parmesan Rosemary Bread will have your family asking for more.
And, let me just say at the beginning, this post is chock full of super helpful tips, tricks, and observations from my awesome husband, who wrote this post.
If you’re one of those people that doesn’t like “words” just scroll to the bottom now to get the recipe card for this rosemary parm bread, or use that handy dandy “jump to recipe” button at the top.
We appreciate your support
Please let me know if you have any questions about this recipe. I read all the comments myself and I try to help as soon as I can. I have readers from all levels of comfort and experience in the kitchen on my site, and I’ve tried to answer some of your questions already in the post. But if I’ve missed anything, please feel free to leave a comment and ask.
Quarantine baking
This is a guest post from my very carb-loving husband. You may remember some of his other recipes, such as his World Famous Gumbo, Smokehouse Style Slow Cooker Beef, Carnitas Sliders, and Shrimp in Cajun Spice Oil.
He has been working on his quarantine baking, and we wanted to share some of it with you. Seriously, this bread is so easy; anyone can make it. And it’s so good.
He also uses this same recipe and method to make beautiful white bread – just leave out the Parmesan and the rosemary. It’s a fantastic homemade loaf of white bread.

Why did I make this recipe?
To start off, let me say that I am by no means a bread expert. I don’t come from a family of bakers, I haven’t been making bread my whole life, and I don’t have any formal cooking or baking training.
What I do have is a true love of carbs, a fascination with bread and a desire to learn. I have wanted to make bread since I was a kid but I was afraid of it. I want to help anybody else get past that fear so they can make tasty bread that fills your house with amazing aromas! And I want to help you understand what you are doing and why so you can play around with the recipe and have fun with it.
For several years I’ve been working on my bread making skills. I’ve been making recipes, studying bread making techniques, and generally learning everything I can about what is going on in recipes and why. You see, I’m one of those people who isn’t satisfied just getting an answer, I really want to know why.
Why does one bread recipe call for warm water and another one says to use ice cold water? Why does one recipe use ½ teaspoon of yeast while another one uses 2 teaspoons? If you can make bread without kneading the dough, why do so many recipes tell you to knead the dough? I’ve ended up finding the answers to a lot of these questions but it has taken a lot of time and the answers have come from many different places. Hopefully I can gather some of that information in this recipe so you don’t have to look all over the place for it like I did.
There are certainly enough no-knead bread recipes out there, so why come up with another one?
The main reason I started working on this recipe was to address the wide range of resting time that I kept running into with other no-knead recipes. When I would read a recipe and it would say something like “let it sit for 8-24 hours” I would get really frustrated.
How can I plan my time when there is that much variation in the recipe? If I want to impress guests and make bread for dinner, when do I start it? Do I start it at 9am so it’s ready to bake at 5pm (8 hour rest) or do I need to start it at 5pm the day before (24 hour rest)? Can I cook it any time after 8 hours but before 24 hours and have it turn out fine or is there something specific I’m waiting for and cooking it too soon will ruin it? How often do I need to check it to see if it’s ready?
All of these kinds of questions sent me looking for answers that I couldn’t find. So I worked up my own recipe that doesn’t have a 16-hour variable in the timing and hopefully has enough explanation as well as tips and tricks to help you out along the way.
I hope to pass on some of what I’ve learned along my bread making journey so you can feel more comfortable and have fun in the kitchen. All that being said, if you are super comfortable making bread and just want a new recipe, feel free to skip all this and go straight to the recipe at the bottom.
Why do some breads get kneaded and some don’t?
It comes down to building strength. All bread dough needs a certain amount of strength. When you bake the bread you want it to rise, and to do that it needs to hold in the hot air and steam inside the dough. Kind of like a balloon. If a balloon isn’t strong enough to hold the air it pops and you have a sad balloon. You don’t want a sad loaf of bread.
Kneading dough builds that strength in the dough but it requires work on your part.
Well, somewhere along the way, someone figured out that the dough will build strength on it’s own if you just give it enough time. I wish it worked like that for my abs! LOL! Anyway, so the dough will get strong on it’s own without any work but it will take longer. Kneading the dough will make it stronger faster but requires more work. So that’s the trade off.
What’s with the 8-24 hours of waiting time for some recipes? Why the wide range of time?
The recipes I’ve seen don’t really explain exactly why the range is so big but I suspect it has to do with different environments. Yeast works faster when it’s warmer and slower when it’s colder. Since the recipe writer doesn’t know if you keep your house at 55 degrees or 85 degrees, they can’t say exactly how long it will take for the yeast to do it’s work. It may also have something to do with the freshness of your yeast.
I recently came across a container of yeast in the back of our fridge that was really old. It was 6 ½ years past the expiration date! Don’t judge, you know you have some old stuff hanging out in your cupboards as well. LOL! I tested the yeast and it still works! But it certainly doesn’t work as quickly as the un-expired stuff.
So if you are doing a no-knead bread you need to give the yeast time to work it’s magic and that amount of time is going to vary widely if you rest it on the counter.
Is that why your recipe rests the dough in the fridge?
That’s part of the reason. Refrigerators tend to be much more consistent in temperature compared to houses in different climates. So resting it in the fridge helps to control the amount of time and let you better plan when your bread will be ready.
That let me make a recipe that works for my timing. Like I said, I’m not a professional baker. I have other things I’m doing in life and I can’t dedicate a whole day to making 1 loaf of bread.
Since I’m not a morning person, I want a recipe I can start in the afternoon or evening, rest it overnight and then bake it sometime the next day so it’s ready for lunch or dinner. While waiting overnight might be a long time, it’s easy time in the sense that I don’t need to keep track of the dough.
But there is another secret reason for the fridge time. (I guess it’s not so secret if I’m telling everybody). That secret reason comes down to flavor. When I was learning how to make pizza dough I found some recipes that said they were ready to use after 30 minutes and other recipes that had you wait 3 days before using it.
Eventually I came across an explanation that said the 3-day doughs develop more flavor. I don’t know all the scienc-y stuff but basically the longer yeast works the more flavor it develops in the dough. But if you let yeast work too long at room temperature it can make your dough too spongy with air and sticky. That makes it difficult to handle and then when you handle it the air escapes and it deflates too much. We don’t want sad balloons or sad dough.
Remember how I said yeast works more slowly when it’s cold? By resting the dough in the fridge, the yeast slows down so it works for a lot longer before the dough is ready and that extra time means extra flavor. At least that’s my theory. I haven’t exactly tested them side-by-side. Controlling the resting time is a good enough reason for me to rest it in the fridge.
So exactly how long do I need to wait before baking the bread?
If there is one thing I’ve learned on my bread making journey, it is that it’s not about an exact time; it’s about when the dough is ready. This is where you really have to step outside your comfort zone and learn what to look for in the dough. But don’t worry; this post is here to help teach you. First off, I strongly recommend that you mix your dough in a clear glass mixing bowl or a (affiliate link) 2-quart Pyrex measuring cup or batter bowl.
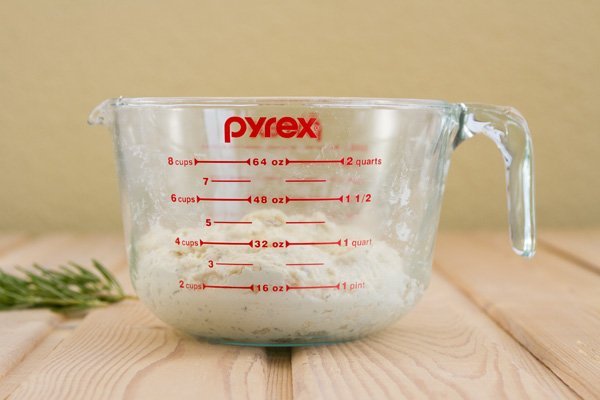
This way you can see the top of the dough but also the sides and the bottom of the dough. For me, the sides and the bottom tell me a lot more about what is going on with the dough. After you have mixed the ingredients together, spend some time looking at it.
After you mix the ingredients, your dough should look something like this. It doesn’t have to look exactly like this, shaggier is just fine.
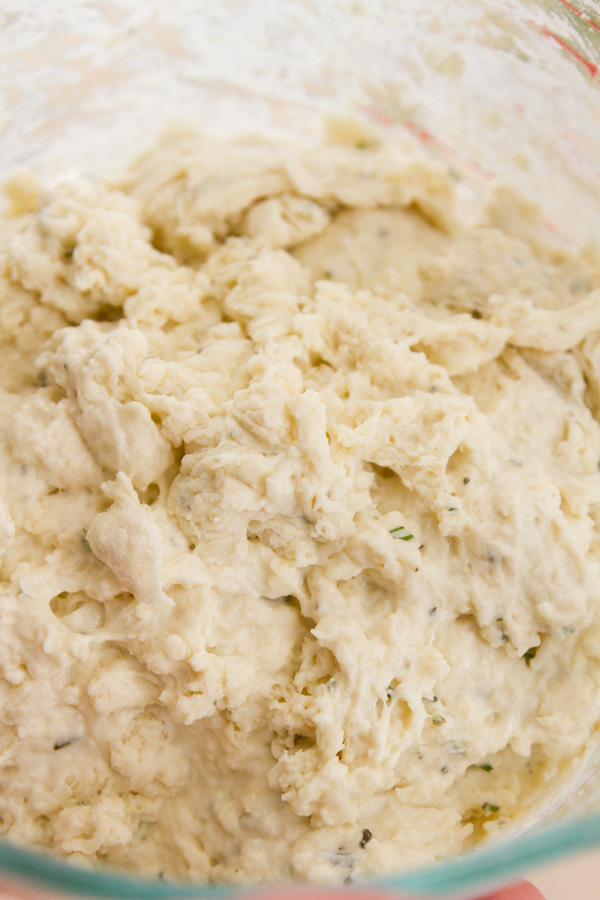


For the top, look at the texture and how much form it has. Look at the shagginess and how it is probably mounded up more in the middle from the mixing. Look at where the dough contacts the sides of the bowl and how far up or down the side of the bowl it is. This is easy to see if your bowl has measurement marks. Look through the glass at the sides and the bottom. Other than some voids between the shaggy stuff, there isn’t much air in the dough. You certainly wouldn’t call it bubbly.
Now you leave the dough on the counter for an hour before it goes into the fridge. This isn’t a super critical step and sometimes I’ve been in a rush and just put it straight in the fridge after mixing it.
The counter time is just to let the yeast get a bit of a start doing its thing before it gets cold in the fridge and slows down. Again, it’s something I like to do but not absolutely critical. If we need to we can do things to help the dough develop after it comes out of the fridge the next day. Let it sit in the fridge overnight and check on it when you get up the next day.
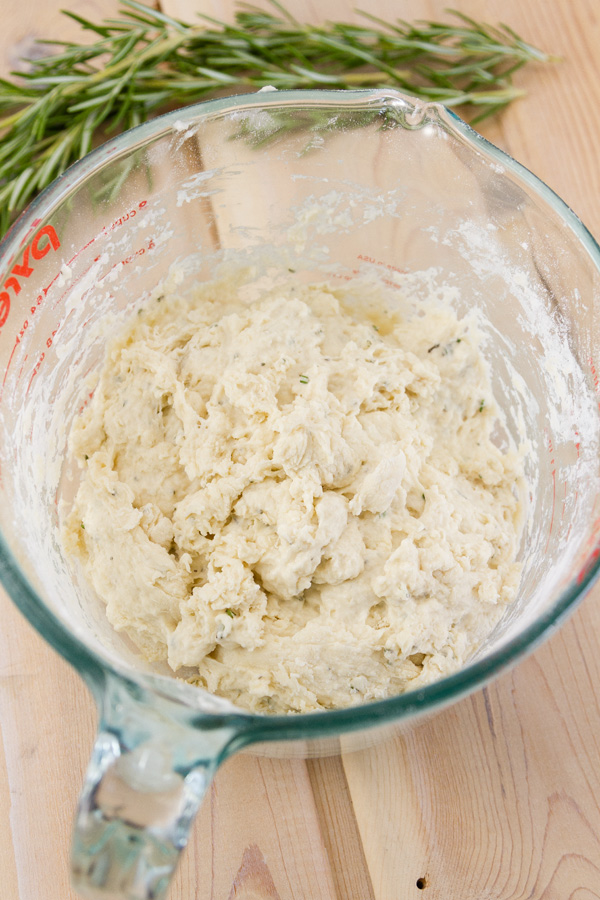
Now look at the dough after it has rested, just before I baked it.
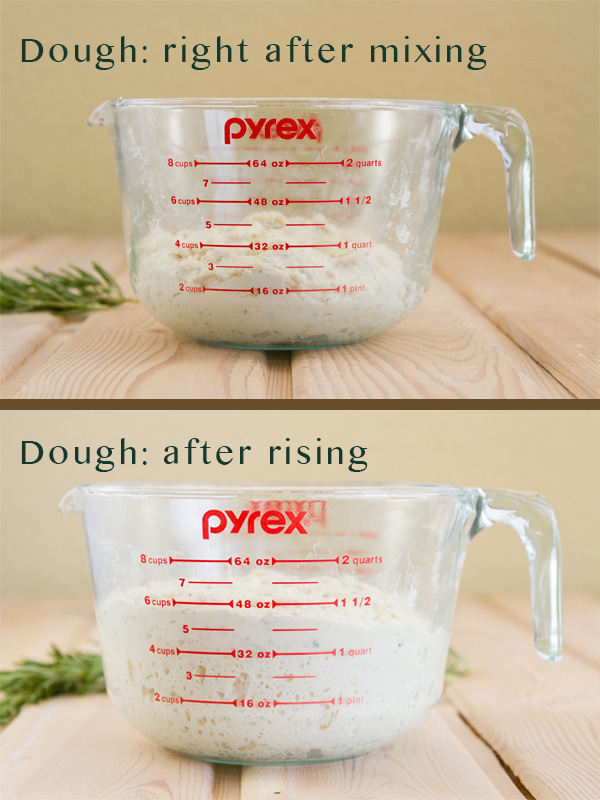

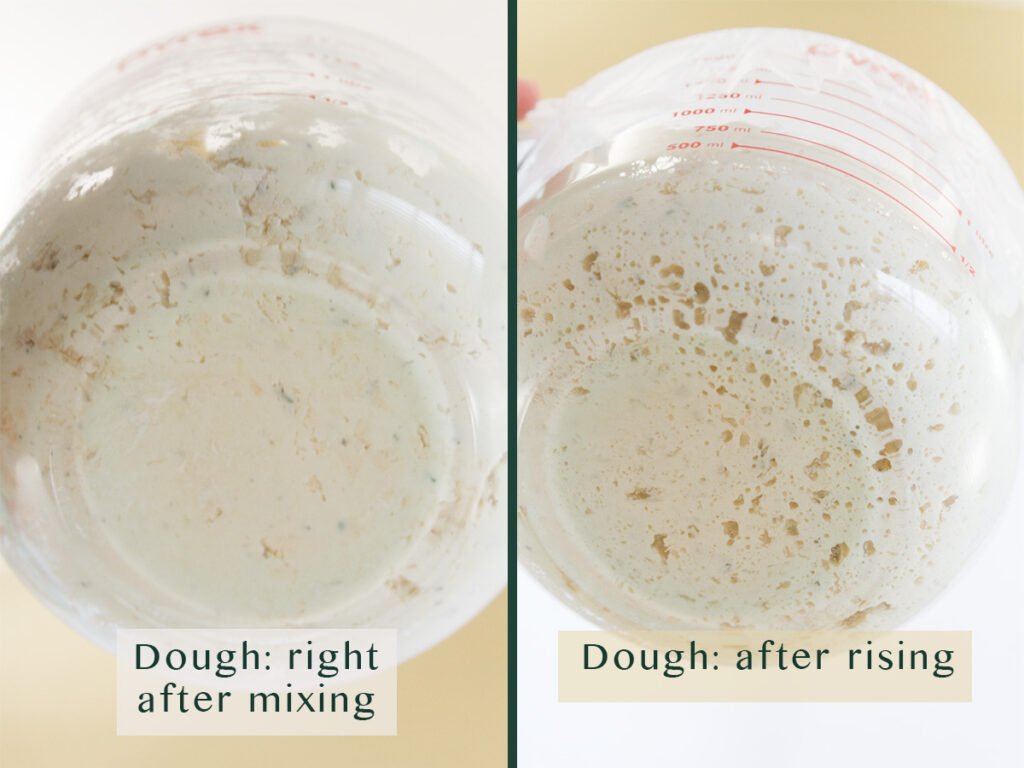
The dough definitely has more volume, the top has smoothed out and everything has mushed together. Looking through the glass at the sides and bottom you can see that the voids between the shags have filled in and the dough itself has a lot of little air bubbles in it. It is definitely bubbly. This bubbliness is what you want more than anything else.
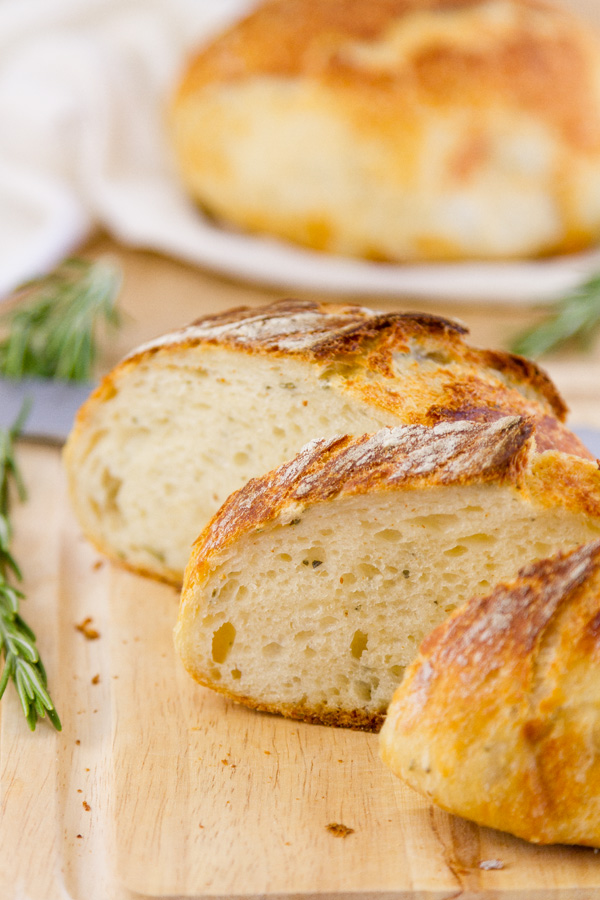
Those bubbles will expand and create the texture in the bread. More bubbles means more openness in the bread. If you like bread with big open pockets on the inside, go for more bubbles at this stage.
When you check the dough first thing in the morning, if your dough looks like this, you are all set. You can plan to bake the bread anytime you want. Just leave it in the fridge until an hour before baking. But my dough rarely looks ready to bake first thing in the morning. Remember me talking about finding and working with old expired yeast? Well I used that yeast for this recipe, the batch that we took pictures of for this post.
And when I looked at the dough first thing in the morning it didn’t really look any different than when I put it in the fridge. Like I said before, the yeast was 6 and a half years past the expiration date. I had tested it so I knew it worked but I also knew it was working slowly. No big deal, I just needed to help the dough warm up to wake up the yeast and get it to work harder. I’ve heard teenagers need extra encouragement to get going in the morning too LOL!
So I took the dough out of the fridge and put it in a cold oven. I left the oven off but turned the interior light on. Since it was an old style light bulb it produced enough heat to warm up the space. This was a bit of an experiment so I used my wireless grilling thermometer to carefully track the temperature in my oven and it kept a very steady 80-85 degrees, which was perfect. After a couple of hours it was ready to bake. Other times I’ve turned my oven on for just 30 seconds and then turned it off.
That is usually enough to create a warmer space and encourage the yeast to do their work. If you do it that way I would definitely track the internal temperature with a really good thermometer. I wouldn’t want it to get warmer than 85 degrees. If you warm up the dough and get it to where it looks ready to bake but you are not ready to bake it yet, just put it back in the fridge. Again, take it out about an hour before baking it.
Part of what I love about this recipe is that there is a wide range of readiness where you can bake it and it will be delicious! It may be a little different texture, more or less airy, but it will still be impressive and delicious! This is something you can have fun playing with each time you make this bread until you figure out what you like the best.
Can I make this bread the same day?
Recently Debi made a new soup for the blog and we thought a loaf of this bread would go great with the soup for dinner. The only problem is this recipe needs to be started the night before you want to bake it and we didn’t plan that far ahead.
So I decided to see if I could condense the rise time and cook it the same day. After all, this bread making stuff is all a big experiment for me anyway. And we were both willing to run the risk of not having fresh baked bread with dinner since we didn’t plan for it anyway. So after breakfast I got right to mixing the dough. Since we are trying to speed up the recipe, be sure to heat your water to the correct temperature for your yeast. If your water is cold it will slow down the recipe.
Since the mixing is really fast and easy, I was done by 8am. Normally this recipe uses the cold of the refrigerator to slow down the rising but I wanted to speed it up. So instead of putting the dough in the fridge, I went straight to a warm place to let the dough rise. The only problem, it was October and my house was not warm that day. It was only 67ºF in my house and I was pretty sure that wouldn’t cut it for getting the dough to rise before dinner time. So I went to my old trick for creating a warm place for dough to rise. I put the dough in a glass bowl and covered it tightly as usual. Then I emptied our oven and put the dough bowl in the cold oven. Then, using a timer, I turned on the oven and let it run for exactly 30 seconds before turning it off. I left the dough in there, with the oven light on, for 3 hours.
Note that I also use an oven probe to track the internal temperature of the oven. When I do this little oven trick, the internal temperature briefly spikes to around 90ºF and then settles down to 80-85ºF. I highly recommend using an oven probe thermometer if you are going to do this trick. I have used this trick with 2 different ovens and it always works. But 2 ovens is by no means exhaustive testing, so your results may vary.
After the 3 hours, the dough looked nicely puffy and ready to bake. This is partly why I like to use a glass bowl. I can look through the oven window and see how the dough is doing without opening the oven. Opening the oven would let all the nice warm air out and I would have to try and warm it back up again without making it too warm and that would be difficult.
So it was 11am and the dough was ready to bake but we wanted hot, fresh bread with dinner so I didn’t want to bake it right away. I just took the dough out of the oven and let it sit on the counter. My house was still 67ºF and I thought that it would slow to dough down enough that it wouldn’t over rise. If my house was above 70ºF I would probably put the dough back in the fridge until I was ready to bake it. I’ll have to test that idea next time.
Then at 2pm I started the regular baking process. The great news is the loaf turned out perfectly. Honestly I couldn’t tell the difference between this loaf and the overnight method! So this is a great new method that makes this recipe even more versatile. I hope you try it and I hope you love it. Enjoy
SAME DAY COOKING DIRECTIONS:
- Stir everything together to a shaggy dough
- Place dough in a glass bowl and cover tightly with plastic wrap
- Place bowl of dough in a cold, empty oven
- Using a timer, turn on the oven and let it run for exactly 30 seconds then turn it off
- Leave the oven closed and let the dough sit for 2-3 hours, until puffy and ready to bake
- Preheat Dutch oven to 450°F
- Shape dough
- Cook covered 30 minutes
- Cook uncovered for 7-15 minutes until color is how you like it
- Temp bread for 190°F
- Cool a minimum of 30 minutes before cutting
Ok, the dough is ready to bake. How do I shape it? How important is the shaping to the success of the bread?
The good news is I have used several different techniques to shape this recipe and it has always been tasty. So you don’t need to pressure yourself on the shaping. Sometimes I just dump the dough out, push any edges in until it is roughly round and then just bake it.
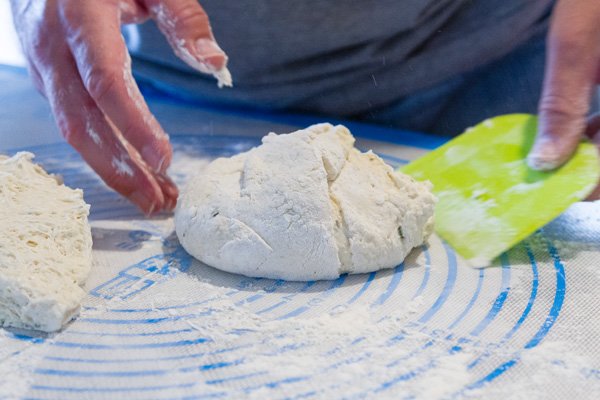


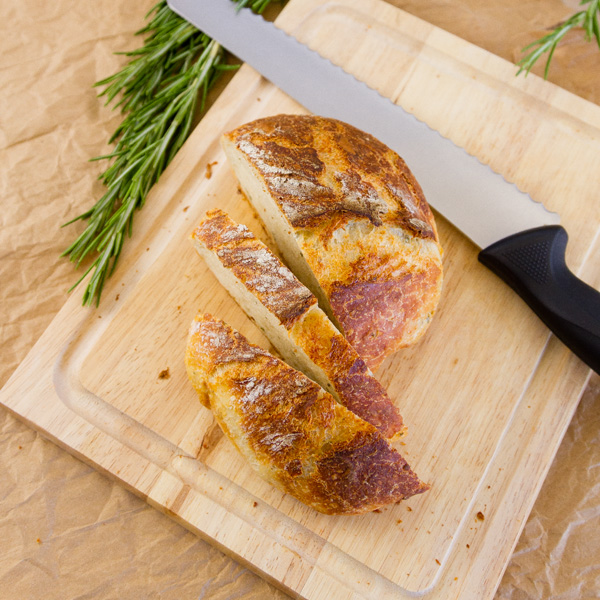
Other times I have practiced different shaping techniques I’ve seen in videos. For this batch I knew we would be taking pictures so I tried to use all the tricks I’ve ever learned to shape it as beautifully as possible. I had to cut the dough in half and cooked it as 2 smaller rounds because of the size of my Dutch oven. So I tried to shape them both the same way, but you can see from the pictures that they came out quite differently. Oh, well, still delicious!
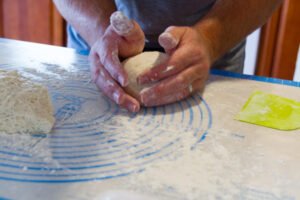
So like I said, you can just push in the edges to make it round or you can try my favorite method. I try to dump the dough out so the part that was on top in the bowl is face down on the floured counter. After dumping the dough out, I take an edge and fold it into the center and stick it there.
Since there is no flour on the face up side, it sticks pretty easily. I go all the way around the outside edge folding it into the center. 6-8 folds, all-together. Then I flip the ball over so it is right side up again and using cupped hands I press the sides in until it is round. That’s it. Done and ready to bake.
Can I make just 1 loaf?
I think the question we get the most often is about the size of the loaves (or loaf) and the size of the vessel that it’s baked in.
Again, don’t fret on this. The one thing we have found is that a cast iron or enameled cast iron produces a great loaf of bread. But the size of the vessel doesn’t really seem to matter.
We typically use a 2 quart cast iron Dutch oven. Here’s a great one on Amazon, with my affiliate link, that’s a great price if you don’t already have one.
With a 2 quart vessel, you can make this bread as one loaf or as two (as called for in the recipe card). If you make one loaf rather than two, the baking time will stay the same. It may take a couple of extra minutes to brown nicely at the end of baking, so keep an eye on it, and just pop it back in for a couple more minutes if it isn’t as brown as you like.
If your cooking vessel is smaller than 2 quart, you definitely want to make this as two loaves.
And, let’s say that your Dutch oven is larger than 2 quart, well, I’d suggest just making one loaf. Again, it should cook in the same amount of time as called for in the recipe.
One benefit to making 2 loaves as opposed to one, is that you get more crust. And we love the crusty parts!
Is there anything else I should know?
My last tip is to make sure you let the bread rest after it comes out of the oven. At least 30 minutes if you can control yourself. The bread will be too hot to eat anyway but it will also have a lot of steam inside. If you let it rest the dough will absorb that moisture.
If you cut into it right away that moisture will be lost. You may not notice it if you eat all the bread right away but if you save any for the next day it can be really dry from losing the moisture. I think that’s it. Enjoy baking bread! 🙂
Serve this bread with a delicious hearty bowl of Crock Pot Vegetable Soup, Creamy Noodle Soup, or Tahini Wild Rice Soup for a great comfort food meal!
Kitchen items you may need
Note: these are affiliate links
2-quart glass measuring cup
Scale
Pastry mat
Bench scraper
Cheese Grater
Instant read thermometer
Dutch oven
Parchment paper
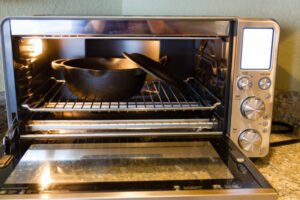
Breville countertop oven
Tea towels
Bread knife
Let’s connect
If you like seeing my recipes subscribe via email in the upper right.
Or, connect with me on your favorite social media channel for recipes, photos, & much more:
Pinterest, Facebook, Instagram, YouTube and Twitter!
And find my shop on Amazon for recommendations on cool tools
If you try this recipe,
please come back & leave a comment below letting us know how it goes.
Share a picture & tag @lifecurrents on Instagram.
Or you can upload a “tried it” photo (I would love to see)
via the pin.
No Knead Parmesan Rosemary Bread Recipe

No-Knead Parmesan Rosemary Bread
Equipment
- Dutch oven or a large oven-safe dish with a lid rated for 450°F
Ingredients
- 3 ½ cups all-purpose flour (420 grams)
- 2 teaspoons kosher salt (not table salt) (10 grams)
- 4 ounces Parmesan cheese grated (2 cups), optional
- 1 tablespoon minced fresh rosemary optional
- ½ teaspoon active dry yeast or instant yeast
- 1 ½ cups warm water 100-110°F for active dry yeast, 120-130°F for instant yeast
Instructions
QUICK DIRECTIONS:
- Stir everything together to a shaggy dough
- Let the dough rest
- Preheat Dutch oven to 450°F
- Shape dough
- Cook covered 30 minutes
- Cook uncovered for 7-15 minutes until color is how you like it
- Temp for 190°F
- Rest before cutting
DETAILED DIRECTIONS:
- In a large bowl, stir together the flour, salt, Parmesan, rosemary, and yeast. Stir the ingredients until the Parmesan is evenly coated with flour and everything is evenly mixed. Tip, when adding ingredients put the yeast and salt on opposite sides of the bowl. Never put the yeast and salt directly on top of each other because the salt could kill the yeast. Stir in the water using a wooden spoon until the mixture forms a shaggy but cohesive dough (see picture). Don’t overwork it. It won’t look much like dough at this point and that’s ok. Just make sure there are no big pockets of dry flour. A little dusting of dry flour is fine; it will get moist while the dough rests.
- Cover bowl tightly with plastic wrap. Let dough sit at room temperature for 1 hour or so and then refrigerate overnight. Check the dough in the morning to see if it has developed enough. (See the blog post above for what it should look like and what to do if it doesn’t look right) TIP: If you mix it in a 2-quart Pyrex measuring bowl you can use the measurement markings to see how much it has grown in volume.
- If the dough hasn’t developed any significant volume or air bubbles, move it to a warmer place so it can develop a bit faster. Once it has developed enough, put it back into the fridge. An hour before you want to bake the bread, take the dough out of the fridge and put it on the counter so it can start to come up to room temperature. To be honest, I don’t always remember to do this and the bread has always turned out anyway.
- While the dough is coming up to room temperature, put your Dutch oven, including the lid, into your cold oven and start preheating your oven to 450° F. Once your oven is up to temp, leave the Dutch oven in there another 30 minutes to make sure it is fully heated all the way through. I leave the lid off the Dutch oven to make sure the heat can get inside. The extra heat stored in the Dutch oven starts cooking the bread rapidly once you add the dough and this fast cooking helps the bread rise.

- While your Dutch oven is preheating for that last 30 minutes, turn the dough out onto a well-floured surface. With floured hands, form the dough into a ball. Cover the dough with plastic wrap and a tea towel and let rest until the Dutch oven is finished preheating.
- After the preheating is done, carefully remove the Dutch oven. If your Dutch oven is enamel coated you can place the bread dough directly into the Dutch oven. If your Dutch oven is raw cast iron, place the dough on a piece of parchment paper before putting it in the Dutch oven. If you don’t have parchment paper you can use aluminum foil sprayed with cooking spray to keep the bread from sticking.

- Cover and bake for 30 minutes. Then remove the cover and bake for an additional 5-15 minutes uncovered. This time will vary based on your oven and your preference for golden brown color. This uncovered baking gives the loaf it’s final color. You can take it out of the oven when it is the color you like. For the pictures in this post I cooked one loaf uncovered for 10 minutes and the other one for 5 minutes so you could see the difference. Using an instant read thermometer, check for an internal temp of 190°F. If for some reason the color is where you like it but the loaf isn’t 190°F you can put the cover back on and continue cooking. But honestly, I don’t always temp the bread and it’s always been delicious. Enjoy!

Notes
Nutrition
Nutritional information is based on third-party calculations, and should be considered estimates. Actual nutritional content will vary based on brands used, measuring methods, portion sizes, and more.


Lois Dixon
I don’t have a Dutch oven. Can I still make this bread?
Debi
Lois, I’ve heard stories that you can bake it without a Dutch oven, but I’ve never tried it. The Dutch oven helps keep the heat and moisture in. If you do try it, make sure your pot has a tight fitting lid and that it’s oven proof (no non-stick or plastic parts). Amazon has fairly inexpensive Dutch ovens for sale (affiliate links) https://amzn.to/2Pj6dr7 and https://amzn.to/335iJSY I love cooking with my dutch ovens for all kinds of things besides bread – stews, soups, braises.
Dorothy at Shockingly Delicious
I have to say, this is a truly OUTSTANDING tutorial! Well done. You have covered every question!
Julie Menghini
My bread loving heart loved this bread. It was so easy to make and absolutely delicious!
Kathleen Pope
I love no knead breads and adding the rosemary and Parmesan makes it savory bread heaven! Such a great tutorial too! Can’t wait to make it!
Paige
Yours looks SO GOOD and really feel like like I can make this with the great tutorials you have here! Cant wait to make this!
Ali
Debi, please forgive me if I overlooked it, but would a 5-quart Dutch oven hold the entire loaf? Thanks so much.
Debi
Ali, it will definitely fit in a 5-quart Dutch oven. We typically cook it in a 2 or 3 quart Dutch oven, so you’ll have lots of extra room. We’d love to hear how it turns out for you after you’re done!
Kate B.
Fabulous recipe and can’t wait to try it! I have a question about the amount of yeast you used for this recipe. I’ve made a similar bread with 2 tsps of quick rising yeast. Would 1/2 tsp be sufficient to get the correct rise? Thank you in the advance for your input!
Debi
Kate, I suspect that your quick rising yeast is the same as the instant yeast that we have. Manufacturers will name the same thing different names.
I haven’t tested anything with the name “quick rising yeast” but I have tested “instant yeast”. The instant yeast I’ve used is Fleischmann’s bread machine instant yeast. The jar says it’s also ideal for all rapid rise recipes. So, I’d expect it to be interchangeable with quick rising yeast, but I don’t know for sure. Based on my testing, it may take a little longer or shorter for the yeast to develop, so just be sure to look at the development of the yeast (the bubbles). For easy visuals, take a look at the pictures we’ve included in the post for examples.
We’d love to know how it comes out, and happy eating!
Kate B.
Hi Debi!
thank you so much for your quick response to my question about the amount of yeast. 🙂 I do have the same one that you used. I was just wondering if 1/2 tea spoon is enough for the 3.5 cups of flour. I used 2tea spoons to make the similar bread. Thanks again!
Debi
Kate,
Oh I’m so sorry I misunderstood your question.
Yes, it is ½ teaspoon of active dry or instant yeast. My husband makes this all the time!
Here’s the longer explanation of why you can use so much less yeast for this…
The long rising time in the fridge and the fermentation time overnight allows you to use less yeast. In fact, the cold environment of the fridge interrupts the puffing up process, and makes it so the yeast gets sleepy and less active.
Using more yeast, like in other recipes, simply causes the bread to puff up faster, so less rising time. You could absolutely use more yeast in this recipe as long as you keep a close eye on how quickly it puffs. If you were to use 2 t make sure to keep a close eye on it to make sure it doesn’t over proof.
It’s not in the recipe, but he has used as much as ¾ t when he wants it to rise a bit faster.
Sorry again for the confusion on my part! 🙂
Marie
Hi Debi,
Thanks for this recipe—your bread looks gorgeous! I have a larger dutch oven and am hoping to make one loaf instead of two smaller ones. Any recommendations in terms of the baking time?
Thanks!
Debi
Marie, thanks for the comment. It should bake in the same time frame. My husband makes one loaf all the time. The final browning may take a couple of extra minutes, so if it isn’t as brown as you like, pop it back in for a couple minutes. But otherwise, no changes to the recipe. I think I’ll go back and add that to the info as well. Thanks!
Kat C
This bread is delicious! I will be making it again for a dinner party on Saturday. I just read through the post again and have a question. For the same-day bake method, when you turn the oven on for 30 seconds, at what temperature do you do that? I realize it may not matter much, but I am curious. Thank you in advance for your response.
Debi
Kat, thanks so much for the feedback! You are correct, it doesn’t matter what temp you set the oven at. My husband says he’s lazy and always just uses the last temperature that was set on the oven. In reality, the oven won’t reach any particular temp in that 30 seconds. Have a wonderful time at your dinner party!