This post may contain affiliate links. If you make a purchase through links on our site, we may earn a commission.
I realize that I haven’t done a cooking basics in a long while. And, bread is the staff of life; so what could be more basic? And, this is just about the most basic way to make a great crusty bakery-style loaf of bread that I know of.
We appreciate your support
Please let me know if you have any questions about this recipe. I read all the comments myself and I try to help as soon as I can. I have readers from all levels of comfort and experience in the kitchen on my site, and I’ve tried to answer some of your questions already in the post. But if I’ve missed anything, please feel free to leave a comment and ask.
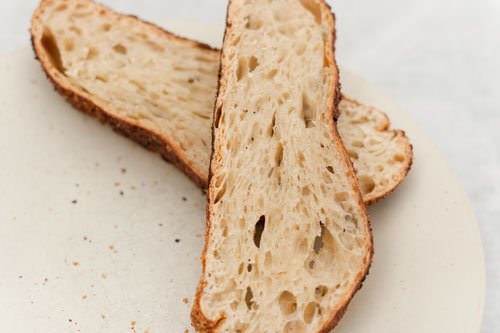
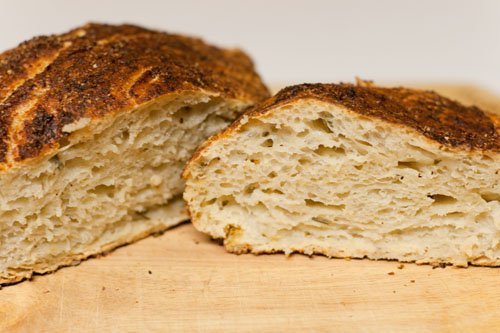
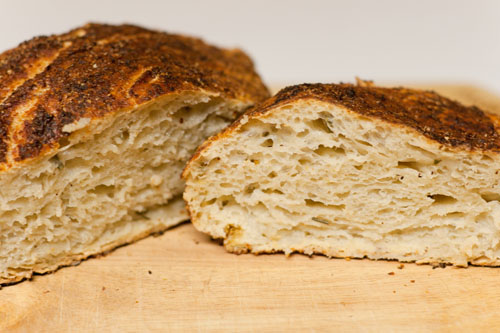
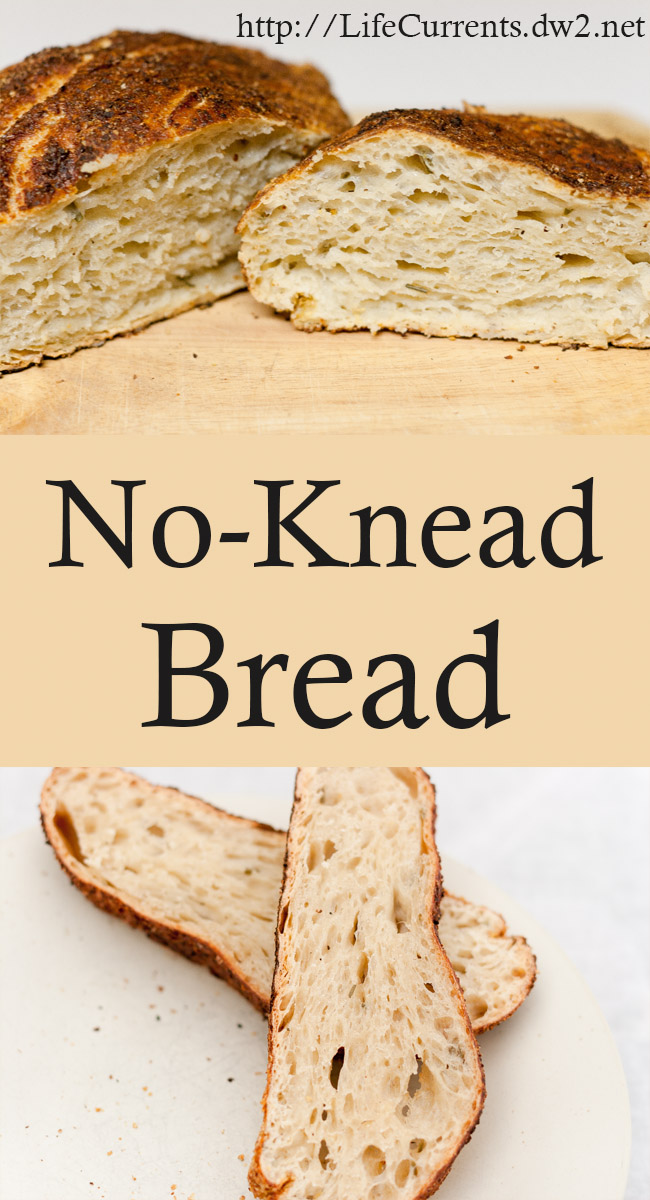
This recipe for no-knead bread has been around since 2006 when Mark Bittman of The New York Times and Jim Lahey of Sullivan Street Bakery popularized it. They state that it’s so simple that a six-year-old could make it. And, I think that’s very true. This recipe gives a nice crusty chewy bread with lots of those beautiful holes throughout the soft inside.
The dough is allowed to slowly rise over a long period of time (12-18 hours during the first proofing or rising). Don’t get stuck on the idea of 18 hours. Depending on your room temperature and humidity, 18 hours may result in over-proofing. When dough proofs too long, the gluten breaks down, the yeast looses some oomph and it can get too soft and soupy. Most of the time, 12-14 hours should be just about right. If you want to prolong the proofing time, but don’t want to risk over proofing, stick the dough in the ‘fridge for several hours or overnight; that’ll slow things down. Then resume proofing at room temperature until it’s ready to bake.
Then, the bread is baked in a preheated covered cast-iron pot (or mini oven), which helps produce that crispy, bakery-style crust on the finished loaf.
Everyone will ask you where you bought this wonderful loaf of bakery bread. Smile and proudly say, that you made it yourself!
No-knead Bread
Ingredients
- 3 cups all-purpose flour
- 1/4 teaspoon active dry instant yeast
- 1 3/4 teaspoon salt
- 1 ½ cups water
- Cornmeal wheat germ, or flour for coating
Instructions
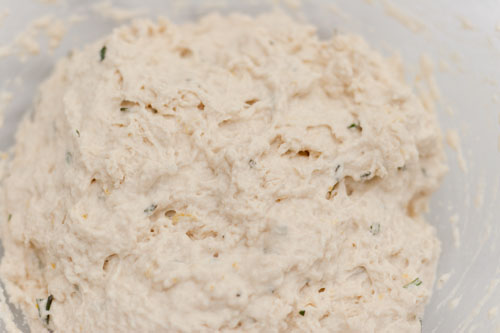
- In a large bowl, combine the flour, yeast, salt. Add water and stir until blended; the dough will be shaggy and very sticky. Cover the bowl with plastic wrap. Let the dough rest at warm room temperature (about 70°F) until the surface is dotted with bubbles, 12 to 18 hours. The dough is ready when its surface is dotted with bubbles.
- Place the dough on a lightly floured work surface. Sprinkle the dough with a little flour and fold the dough over onto itself once or twice. Cover loosely with plastic wrap and let rest for 15 minutes.
- Using just enough flour to keep the dough from sticking to the work surface or your fingers, gently and quickly shape the dough into a ball. Generously coat a cotton towel, (not terry cloth), with cornmeal. Put the dough, seam side down, on the towel and dust with more flour or cornmeal. Cover with another cotton towel and let rise until the dough is more than double in size and does not readily spring back when poked with a finger, about 2 hours.
- At least 30 minutes before the dough is ready, put a 2 3/4-quart cast-iron pot (cast iron, enamel, Pyrex or ceramic) in the oven and preheat the oven to 450°F.
- Carefully remove the pot from the oven. Slide your hand under the towel and turn the dough over, seam side up, into the pot; it may look like a mess, but that is OK. Shake the pan once or twice if the dough is unevenly distributed; it will straighten out as it bakes. Cover with the lid and bake for 30 minutes. Uncover and continue baking until the loaf is browned, 15 to 30 minutes more.
- Transfer the pot to a wire rack and let cool for 10 minutes. Using oven mitts, turn the pot on its side and gently turn the bread; it will release easily.
Notes
Nutrition
Nutritional information is based on third-party calculations, and should be considered estimates. Actual nutritional content will vary based on brands used, measuring methods, portion sizes, and more.

Flavor suggestions
———-
You can also gussy up the nice simple bread, making it savory or sweet. Here are some suggestions, but feel free to come up with new and wonderful ideas of your own.
Parmesan-Pepper
2 teaspoons coarsely ground black pepper or crushed green peppercorns
1/2 cup grated Parmesan cheese
Walnut Bread
Add 1 cup coarsely chopped toasted walnuts
Olive Bread
1/3 cup pitted niçoise (or black) olives, coarsely chopped
pitted dry-cured olives 1/3 cup, coarsely chopped
1/3 cup pitted picholine olives, coarsely chopped
Rosemary-Lemon
2 teaspoons chopped fresh rosemary
2 teaspoons chopped lemon zest
Garlic Herb
1/2 teaspoon dried rosemary leaves
1/4 teaspoon dried thyme leaves
1/4 teaspoon dried basil leaves
2 cloves of garlic, crushed
Pesto
2 tablespoons prepared pesto
Cinnamon-Raisin
1 teaspoon ground cinnamon (or try using cardamom)
3/4 cup raisins (or try chopped dates)
Or, try soaking the raisins in orange juice or rum and add 1/2 teaspoon or orange zest
I also want to try making the bread with some bread flour rather than all-purpose flour. I think it’ll make a harder chewier bread. Or, maybe the first time I change the flours I’ll make it with half all-purpose and half bread flour. We’ll see.
Let’s keep in touch
If you like seeing my recipes subscribe via email in the upper right.
Or, connect with me on your favorite social media channel for recipes, photos, & much more:
Pinterest, Facebook, Instagram, YouTube and Twitter!
And find my shop on Amazon for recommendations on cool tools
If you try this recipe,
please come back & leave a comment below letting us know how it goes.
Share a picture & tag @lifecurrents on Instagram.
Or you can upload a “tried it” photo (I would love to see)
via the pin.


Janette@culinaryginger
There’s nothing better than homemade bread and I love the different options. Great recipe.
Kayle (The Cooking Actress)
homemade bread made easy? no complaints here!
Joanne/WineLady Cooks
This is a terrific recipe. Not too many ingredients and like the add ins. I think my grandson will enjoy making this with me on our next cooking venture.
Culinary Flavors
I love no knead bread it is perfect for the weekdays!