This post may contain affiliate links. If you make a purchase through links on our site, we may earn a commission.
Beet Hummus, made with sweet earthy beets, chickpeas, and a bit of tahini, for a velvety smooth and beautifully pink colored dip. And this is a snack you can feel good about eating because it’s filled with nutrition. It’s a fun twist on the classic hummus.
Sure, you can buy store-bought hummus, but it has all those preservatives and sodium, and isn’t nearly as good as this homemade one. Besides, finding a beet hummus is pretty rare. I love being able to make all these different flavored snacks at home.

We appreciate you
Please let me know if you have any questions about this recipe. I read all the comments myself and I try to help as soon as I can. I have readers from all levels of comfort and experience in the kitchen on my site, and I’ve tried to answer some of your questions already in the post. But if I’ve missed anything, please feel free to leave a comment and ask.
Serving suggestions
I think it’d be really fun to have a hummus bar spread out with lots of different flavors like classic hummus, sweet potato hummus https://lifecurrentsblog.com/sweet-potato-hummus/ , pineapple serrano hummus https://lifecurrentsblog.com/pineapple-serrano-hummus/ , and roasted jalapeno and avocado hummus https://lifecurrentsblog.com/roasted-jalapeno-and-avocado-hummus/ .
And, of course you’ll need goodies to dip into the hummus. Try tortilla chips, pita bread, naan, pita chips, crackers, or veggies like cucumber slices, red pepper, baby carrots, baby zucchini, snap peas, and celery sticks. Try making your own No yeast flatbread https://lifecurrentsblog.com/no-yeast-flatbread/ or sesame seed flatbread https://lifecurrentsblog.com/sesame-seed-flatbread/ .
I like to add hummus to my grain bowls and sandwiches as well.
Pro tips
Hummus is really easy to make at home in the food processor. Here are some tips to help you get a great dip!
Time saving tip: they sell already cooked beets in the produce section of the grocery store. Grab these to make it easy on yourself.
If you don’t have any cooked or leftover beets, here’s my favorite method for roasting beets:
How to roast beets
- 1 pound red beets
- ½ tablespoon olive oil or avocado oil
- pinch of salt
- Preheat oven to 400° F.
- Clean beets of any dirt and loose roots by rubbing the raw beets with your fingers under cool tap water. (You may get some red stains on your hands; don’t worry, it’ll wash off.) If your beets are large, or of varying sizes you’ll want to half or quarter them. They should all be about the same size when they go in the oven.
- Place cleaned and prepped beets in a roasting pan, baking dish, or in a cast iron skillet. Drizzle with a little oil, sprinkle with salt, and toss to coat. Place the pan in the oven, and roast until the beets are fork tender, about 45 minutes if the beets are small or medium in size. If they’re large, the roasting process may take longer, maybe 60 minutes.
I prefer the above method for roasting beets, but you can also wrap them individually in foil with a drizzle of oil and a pinch of salt using the same time and temperature as above, or until tender.
Let cool and peel to use in the hummus.
Tahini tips
Tahini is like a nut butter that’s made from sesame seeds. It’s similar to peanut butter, both in texture and flavor. You can usually find it near the peanut butter or in the international foods aisle of well-stocked grocery stores, including Trader Joe’s and Sprouts.
I like to buy my tahini in glass jars. That way I can heat it up in the microwave (just be sure the label isn’t made with metal foil embossing, and remove the lid). Heating the tahini makes it easier to stir and mix together.
Tahini will separate, the oil rises to the top, just like natural peanut butter. So, if you microwave it, melting it just a bit, it makes it easy to stir and reincorporate those oils back into the sesame seed paste. If you pour off the oils the tahini will be dry and solid, not as creamy and yummy.

Storage
To store leftover hummus, place it in an airtight container and into the fridge for up to 5 days. Homemade hummus doesn’t last as long as store-bought, because it doesn’t have preservatives.
Hummus can also be frozen for a couple of months, though the texture and flavor may change slightly. Once it’s thawed, add in a bit of olive oil to restore the creaminess.
Let’s keep in touch
If you like seeing my recipes subscribe via email in the upper right.
Or, connect with me on your favorite social media channel for recipes, photos, & much more:
Pinterest, Facebook, Instagram, YouTube and Twitter!
And find my shop on Amazon for recommendations on cool tools
If you try this recipe,
please come back & leave a comment below letting us know how it goes.
Share a picture & tag @lifecurrents on Instagram.
Or you can upload a “tried it” photo (I would love to see)
via the pin.

How to make Beet Hummus Recipe

Beet hummus
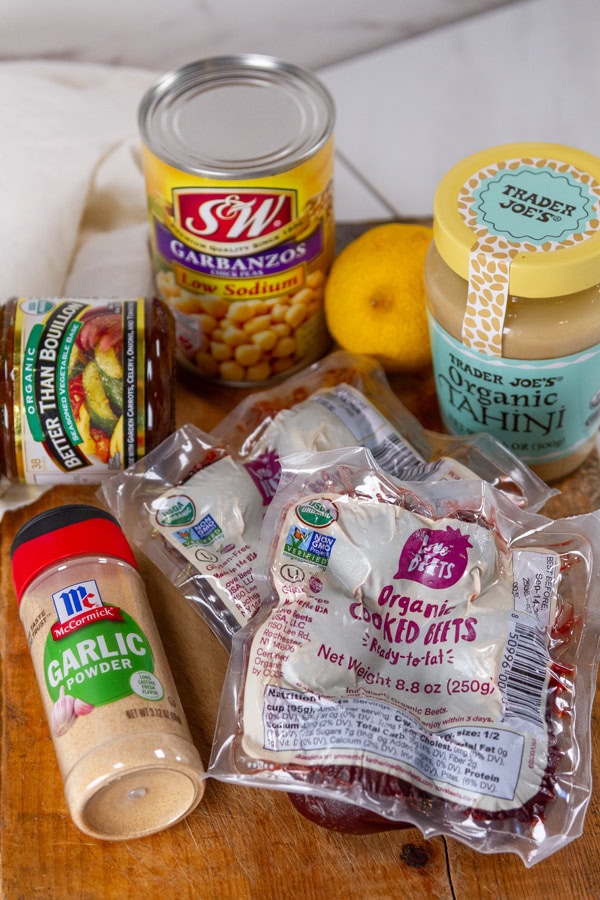
Ingredients
- 1 pound cooked beets
- 15 ounce can chickpeas with the bean liquid
- 1 tablespoon tahini
- 2 tablespoons vegetable broth ,lemon juice, olive oil, or orange juice
- 1 teaspoon garlic powder
- Salt to taste
Instructions
- Drain the chickpeas, reserving the liquid from the can. Purée chickpeas with 2 tablespoons reserved bean liquid and the tahini in a food processor, scraping down the sides occasionally, until they reach a smooth consistency.
- Place the beets in the food processor with the chickpeas. Add in the vegetable broth and garlic powder. Process until smooth and well combined, scraping down the sides of the food processor to ensure that all the ingredients are evenly incorporated.
- If the hummus seems too thick, add in more reserved chickpea liquid, one tablespoon at a time, until desired consistency is reached. Taste for salt. Pop the finished hummus in the fridge before serving to chill it. When serving, garnish with a drizzle of olive oil, a light sprinkle of smoked paprika, or crushed red pepper.
Notes
• ½ tablespoon olive oil or avocado oil
• pinch of salt • Preheat oven to 400° F.
• Clean beets of any dirt and loose roots by rubbing the raw beets with your fingers under cool tap water. (You may get some red stains on your hands; don’t worry, it’ll wash off.) If your beets are large, or of varying sizes you’ll want to half or quarter them. They should all be about the same size when they go in the oven.
• Place cleaned and prepped beets in a roasting pan, baking dish, or in a cast iron skillet. Drizzle with a little oil, sprinkle with salt, and toss to coat. Place the pan in the oven, and roast until the beets are fork tender, about 45 minutes if the beets are small or medium in size. If they’re large, the roasting process may take longer, maybe 60 minutes. Makes about 3 cups total. Hummus is typically 2 tablespoons per serving, so about 24 servings. To store leftover hummus, place it in an airtight container and into the fridge for up to 5 days. Homemade hummus doesn’t last as long as store-bought, because it doesn’t have preservatives. Hummus can also be frozen for a couple of months, though the texture and flavor may change slightly. Once it’s thawed, add in a bit of olive oil to restore the creaminess.
Nutrition
Nutritional information is based on third-party calculations, and should be considered estimates. Actual nutritional content will vary based on brands used, measuring methods, portion sizes, and more.


Debi
Homemade hummus is so easy to make & so good. If you love beets, you’ll love this beet hummus. That pretty pink color and that earthy flavor combine to make something really special.
I hope you give it a try and love it as much as I do. Debi, author, Life Currents