This post may contain affiliate links. If you make a purchase through links on our site, we may earn a commission.
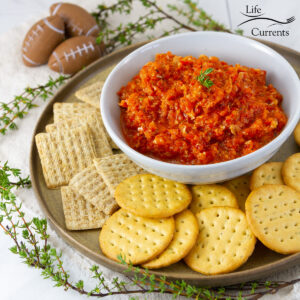
This thick, hearty Red Pepper Garlic Dip pairs perfectly with pita chips, tortilla chips, veggies, crackers, and grilled shrimp. It’s bold, zippy, and full of roasted pepper flavor. This easy to make appetizer is a perfect addition to any party spread, happy hour, game day, or tapas night.
I originally shared this dip in 2015 as part of a tapas spread. I love tapas night!
This year I thought I’d update it as part of Tailgating Snacks Month because it works so well for so many different kinds of parties!

We appreciate your support
Please let me know if you have any questions about this recipe. I read all the comments myself and I try to help as soon as I can. I have readers from all levels of comfort and experience in the kitchen on my site, and I’ve tried to answer some of your questions already in the post. But if I’ve missed anything, please feel free to leave a comment and ask.

Tapas or tailgate party
Let me back up a bit, in case you don’t do Tapas night around your house (and oh you totally should!). Wikipedia defines Tapas as, “a wide variety of appetizers, or snacks, in Spanish cuisine. They may be cold … or hot …. “.
From hummus to veggies to nuts, meats, crackers, dips, spreads, cheeses, just about anything fits into the Tapas spread.
It’s like having a really good cheese plate or charcuterie board with all kinds of flavors.
And, part of the fun of Tapas night is that you get to mix and match flavors and textures. We like to sit in the backyard and have Tapas. It’s just such a refreshing break from the day-to-day activity of life.
Other great tapas dips
Dips can be such a great part of any party, and having a variety of dips for your guests to choose from is so appealing.
Here are some of my favorites that are perfect for any tailgate, tapas, or fancy holiday party. Hot crab dip, Caramelized Onion Dip, Black Olive Tapenade, Garlic butter dipping sauce, Chipotle garlic dip, and Tamarind cashew dipping sauce.

Red pepper garlic sauce
Besides serving this as a dip, it can also be served as a sauce for grilled shrimp (which are a fun addition to Tapas night), fish, or tofu. You know how much I love sauces, and this makes a great one.
It kind of reminds me of a really good Romesco sauce, which is traditionally served with fish and other meats. I love it on roasted or grilled vegetables, as well as fried eggs. Try it on roasted cauliflower!
Romesco is a rich and flavorful purée made from Spanish peppers, tomatoes, garlic, almonds, vinegar, and oil, with breadcrumbs as a binder.
Try this sauce as a spread to add a bright, smoky lift to sandwiches such as grilled cheese or sammies with cold cuts.


How to make this red pepper dip
Be sure to scroll down to the printable recipe card below for ingredients amounts and detailed instructions.
Note: this section contains affiliate links.
Grill the veggies

Slide the garlic cloves onto a skewer, spacing them slightly apart.
Don’t worry about soaking the skewer in water if all you have is a wooden skewer; it’s over the fire for such a short amount of time it won’t catch fire, but you will want to use tongs to pick it up.
If you have a small metal skewer, feel free to use that. The metal skewers that I have are much too large to fit through a garlic clove without breaking the clove apart, so I use wooden skewers here.
Brush the skewered garlic with oil. Grilling the garlic mellows its bite.
Pro tip: Use the roasted garlic on its own as an easy spread for grilled bread, or to embellish flavored butter, grilled poultry, or vegetables.

Place the whole bell peppers and skewered garlic directly on the grill. Cover the grill. Cook the garlic until lightly browned, about 2 ½ minutes per side. Cook the peppers, rotating them as necessary, until the skin chars and blisters evenly, about 15 to 20 minutes total.

The grilled garlic skewer and the grilled red peppers after taking them off the grill.
Steam & chop the peppers

Place the hot charred peppers in a large bowl and cover the bowl tightly with plastic wrap. Allow them to steam for 5-10 minutes.
Remove the peppers from the bowl and, peel the skin. The skin should slip off easily using your fingers. This steaming step helps to soften the flesh of the pepper, and helps to loosen the skin. It also helps to cool the pepper down so that you can easily touch it. You can rinse them under running tap water to help remove some of the charred skin.

Pop it all in the food processor
Remove the stem, the membranes, and the seeds from the peppers, and coarsely chop them, placing them in the bowl of a food processor.

Add the garlic, the remaining oil, and spices to the food processor along with the chopped red pepper. Pulse briefly until all ingredients are combined and starting to get combined.

Add the torn bread, and process, stopping to scrape down the sides of the bowl with a spatula, until the mixture is thick and the texture is where you like it. You can leave it a little chunky or have it be smooth.
Transfer to a bowl and let stand at room temperature for 1 hour to allow flavors to get to know each other. Taste, and adjust the seasonings with salt and pepper as desired.
Want to change it up a bit?
This red pepper dip takes to changes really well too. Want it creamy? Add in some sour cream or cream cheese.
Want it cheesy? Crumble in some feta or queso fresco.
Add in some chopped Kalamata olives for a briny flavor.
A splash of red wine vinegar or a pinch of cayenne pepper will punch it up a bit more.
Can I cook this on the stove top or under the broiler?
I love that all the cooking for this dip is done outside on the grill. It gets me out of the house, and keeps all those smells outside. But, if you don’t have a grill, or don’t want to be outside, you can still make this inside, just under the broiler or a gas stove top.
The taste of home roasted red peppers is beyond compare. Fresh, smoky, and rich, roasted red peppers are so easy to make using your grill, broiler, or gas stove.
What you’re doing by blackening the peppers is burning the skin off. The skin is tough and not really tasty anyway, so the blacker you get the pepper, the more skin you’re getting off, the better it will taste.
For stove top:
Place the peppers directly on the grate of a gas burner. Turn the burner on medium-high, and cook, turning often, until the outside of the peppers are blackened and charred. The top will be difficult to char due to the stem, just try to get it as black as possible without catching the stem on fire.
Place the garlic in a dry heavy bottomed skillet, and cook over high heat. Shake the skillet occasionally until the garlic is soft and charred, about 10 minutes.
Proceed with the rest of the recipe as directed.
For broiler:
Place the whole red peppers and the garlic on a rimmed baking sheet under the broiler.
Place the baking sheet on the top rack of your oven, about 1/3 of the way down. Using tongs, turn the peppers and the garlic over so that they have a chance to blacken on each side.
Broil until the garlic is softened and lightly browned, about 2 minutes each side, and each side of the pepper is blackened, about 5-10 minutes per side.
Let’s keep in touch
If you like seeing my recipes subscribe via email in the upper right.
Or, connect with me on your favorite social media channel for recipes, photos, & much more:
Pinterest, Facebook, Instagram, YouTube and Twitter!
And find my shop on Amazon for recommendations on cool tools
If you try this recipe,
please come back & leave a comment below letting us know how it goes.
Share a picture & tag @lifecurrents on Instagram.
Or you can upload a “tried it” photo (I would love to see)
via the pin.

Red Pepper Garlic Dip Recipe
Red Pepper Garlic Dip
Equipment
Ingredients
- 6 large garlic cloves peeled but left whole
- ½ teaspoon olive oil
- 3 red bell peppers
- 1 tablespoon olive oil
- 1 teaspoon paprika
- ½ teaspoon smoked paprika
- ½ teaspoon dried oregano
- 1 teaspoon salt
- ½ teaspoon freshly ground pepper
- 1 slice sourdough bread torn into small pieces
Instructions
- Preheat the grill to medium-hot.
- Slide the garlic cloves onto a skewer, spacing them slightly apart. Brush the skewered garlic with ½ teaspoon of oil.
- Place the whole bell peppers and skewered garlic directly on the grill rack over the heating elements of a gas grill. Cover the grill. Cook the garlic until the cloves are lightly browned, about 2 ½ minutes per side. Cook the peppers, rotating them as necessary, until the skin chars and blisters evenly, about 15 to 20 minutes.
- While the peppers are hot, place them in a large bowl and cover the bowl tightly with plastic wrap. Allow them to steam for 5-10 minutes. Remove the peppers from the bowl and, peel the skin. The skin should slip off easily using your fingers. Remove the stem, the membranes, and the seeds from the peppers, and coarsely chop them, placing them in the bowl of a food processor.
- Add the garlic, the remaining 1 tablespoon oil, paprika, smoked paprika, oregano, salt, and pepper to the food processor along with the chopped red pepper. Pulse briefly until all ingredients are combined and starting to get chopped. Add the torn bread, and process, stopping to scrape down the sides of the bowl with a spatula, until the mixture is thick and smooth. Transfer to a bowl and let stand at room temperature for 1 hour to allow flavors to get to know each other. Taste, and adjust the seasonings with salt and pepper as desired.
- Serve the dip with fresh veggies, crackers, or sourdough bread that’s been lightly brushed with olive oil and grilled until golden brown.
Notes
Nutrition
Nutritional information is based on third-party calculations, and should be considered estimates. Actual nutritional content will vary based on brands used, measuring methods, portion sizes, and more.


Leave a Reply