This post may contain affiliate links. If you make a purchase through links on our site, we may earn a commission.
These easy and super tasty layered casserole style Vegetarian Red Chile Enchiladas are a Mexican food lover’s dream. The typical vegetarian enchiladas are mostly cheese, but that’s not the case with this layered and stacked vegetable enchilada version.
Vegetarian, healthy, loaded with corn, two types of beans, and light on the cheese, these flat enchiladas will make you happy! And no rolling required with these easy to make ones!
If you’re craving vegetarian comfort food, look no further than these Vegetable Enchiladas! This classic main dish casserole is easy to make and layers on the flavor with a made-from-scratch sauce. Get the recipe and try it out now!
I first shared this recipe in 2011. I’ve updated it here for you with new photos and information for a better user experience. Please enjoy!

We appreciate your support
Please let me know if you have any questions about this recipe. I read all the comments myself and I try to help as soon as I can. I have readers from all levels of comfort and experience in the kitchen on my site, and I’ve tried to answer some of your questions already in the post. But if I’ve missed anything, please feel free to leave a comment and ask.

Homemade Red Chile Enchilada Sauce
This red chili sauce for enchiladas makes a nice complex sauce with just a hint of spiciness but a big taste treat!
It’s complex, with a little kick of spice at the end. Not overpowering, and not salty or sweet. Just a great enchilada sauce.
This sauce can be used for just about any Mexican dish – enchiladas, burritos, beans, or nachos.
You’ll have some leftover sauce from making these enchiladas. Serve the extra sauce on the side so that anyone who wants can spoon some more on top of the enchiladas.
This sauce is great on lots of things. You”l even have a little left over that that you can mix into eggs and scramble for a breakfast burrito.
My other favorite enchiladas sauce that I make all the time now is this easy enchilada sauce.
If you prefer a green sauce, try my roasted tomatillo sauce. You could also make a great Christmas enchilada using both of these sauces. Christmas Enchiladas feature both red and green sauce!

What kind of chiles should I use?
Any dried red chile will work here. New Mexico red chile is a good choice. Dried Colorado (moderate heat that dissipates quickly) or California red chile pods (a mild New Mexico chile) are great mild chiles.

I used dried California red chiles for the sauce in the pictures. California red chiles have a pretty red color, and a mild spiciness. And they are super easy to find at the grocery store for me.
Vary the type of chile used to get different color, flavor, or heat levels to your sauce.
Guajillos will give you a bright red sauce. For a darker sauce use anchos or pasillas.
Try using multiple kinds of chiles in the sauce at the same time. And, this would be a great way to use up some straggler chiles that may be hanging out in the back of your pantry. Check out this great scale on Amazon for chile heat levels.
Tip saving tip: Use ½ cup pre-ground chiles in a jar. Be careful if you use Chili Powder, as these often contain other ingredients.
For instance, McCormick has: Chili Pepper, Spices, Salt, Silicon Dioxide (to Make Free Flowing) and Garlic. If you use this blend, I’d leave out the salt called for in the recipe, and taste at the end to see if the salt level is to your liking.
Yes, generally speaking, most people use chili sauce as a general term for enchilada sauce or red sauce. It’s a spicy sauce that’s made of red chiles.
How to make red chile enchiladas
These enchiladas rojas are the perfect vegetarian main dish – plus they’re easy to make and layered with a delicious from-scratch sauce. Get ready for an unforgettable meal!
The full printable recipe ingredients and instructions are available in the recipe card at the bottom of the post. You can find important tips and tricks in the post.
From scratch sauce
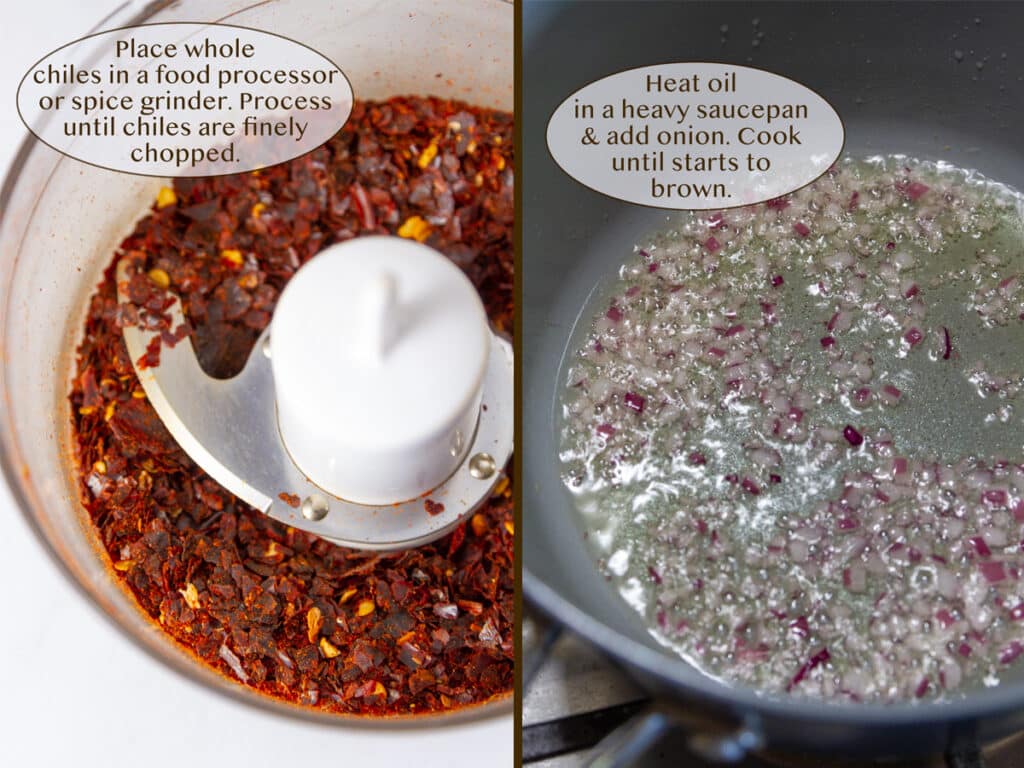
Place whole chiles in the bowl of a small food processor or in a spice grinder. Grind until chiles are finely chopped and uniform in size.
Ground chiles should measure ½ cup. If you don’t have ½ cup, grind remaining chiles as needed. Or, add to them with some jarred chili powder.
Heat oil in a heavy saucepan over medium-high heat.
Add onion and cook until it begins to brown, about 5-10 minutes, stirring occasionally. Drop in the garlic and oregano and continue to cook until garlic becomes fragrant, which will take a minute or less.
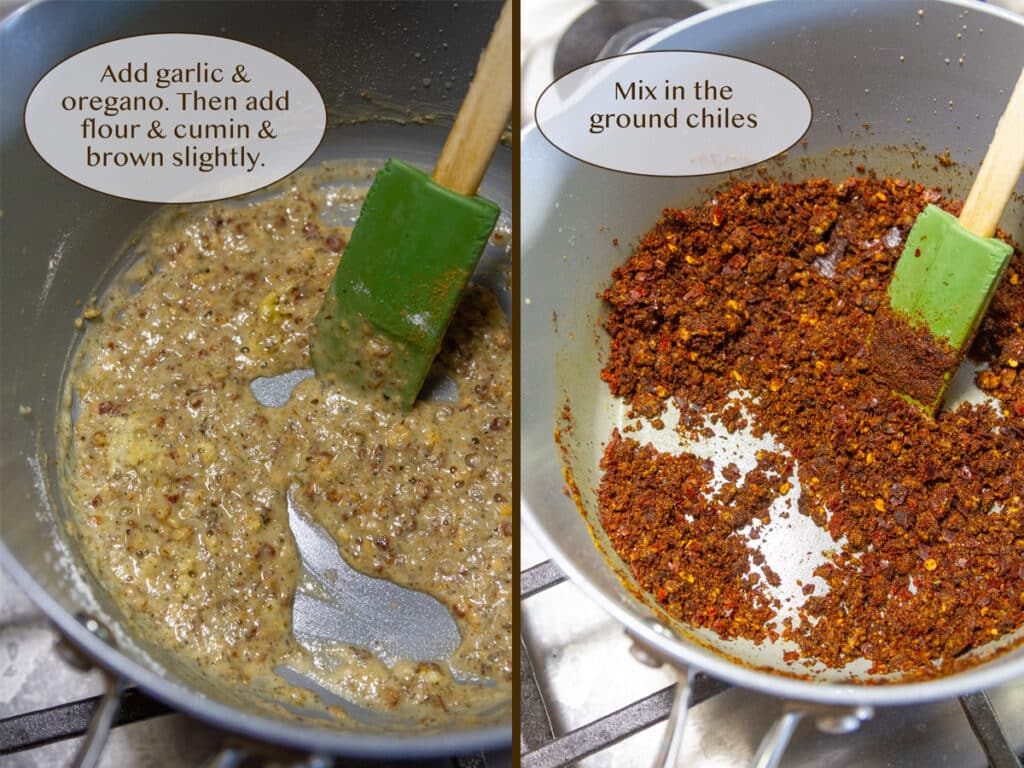
Add the flour and cumin, and brown the flour slightly.
Whisk the ground chiles, water, and salt into the mixture. Stir as the sauce thickens, then lower the heat and simmer, stirring occasionally for 15 minutes.
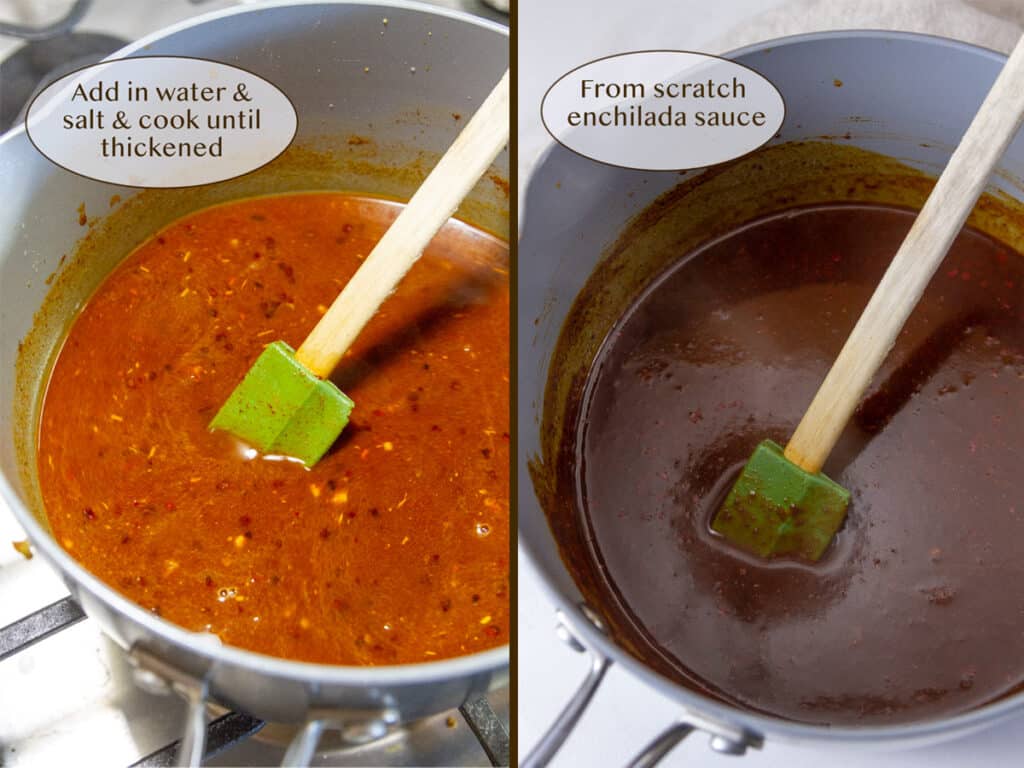
The sauce can be strained at this point to create a silky smooth red chile sauce, or it can be used as a rustic red sauce and not strained. I never strain it and just use it chunky. I figure, it’s going on vegetables and beans with different textures anyway.
Layer those enchiladas
Preheat oven to 375°.

Heat oil in a large frying pan over medium heat. Add onion and cook until translucent, about 4 minutes. Add corn and cook until hot. Set aside.
Put 6 ovenproof baking dishes (each about 12-oz. capacity) on a rimmed baking sheet. The rimmed baking sheet will provide a great steady surface to move the dishes into and out of the oven.
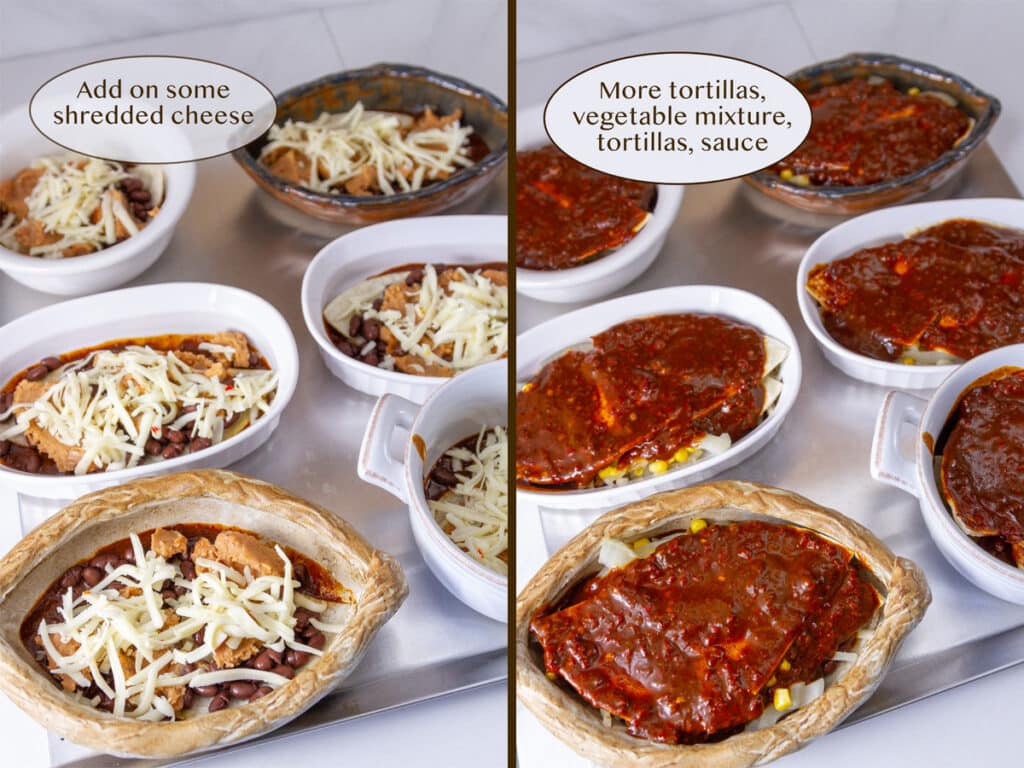
Working with one dish at a time, spoon in 2 tablespoons enchilada sauce. Top with 2 tortilla quarters, 2 rounded tablespoons each refried beans and black beans, 1 tablespoons cheese, and 2 more tortilla quarters, pushing tortillas down gently as you layer them over cheese and beans.
Spoon in 1/3 cup (packed) vegetable mixture, then 2 more tortilla quarters, 3 tablespoons enchilada sauce, and 2 tablespoons cheese. Repeat layering with remaining dishes.
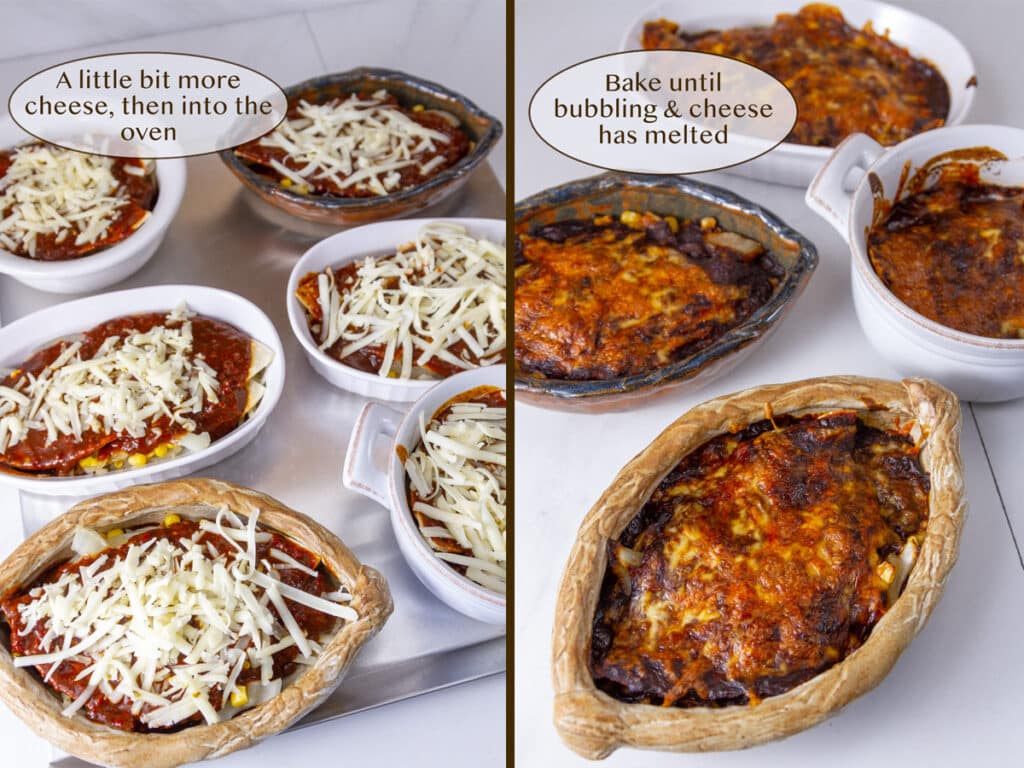
Bake ‘em up!
Bake enchiladas until bubbling, cheese is melted, and tortillas are starting to brown on edges, about 25-30 minutes.
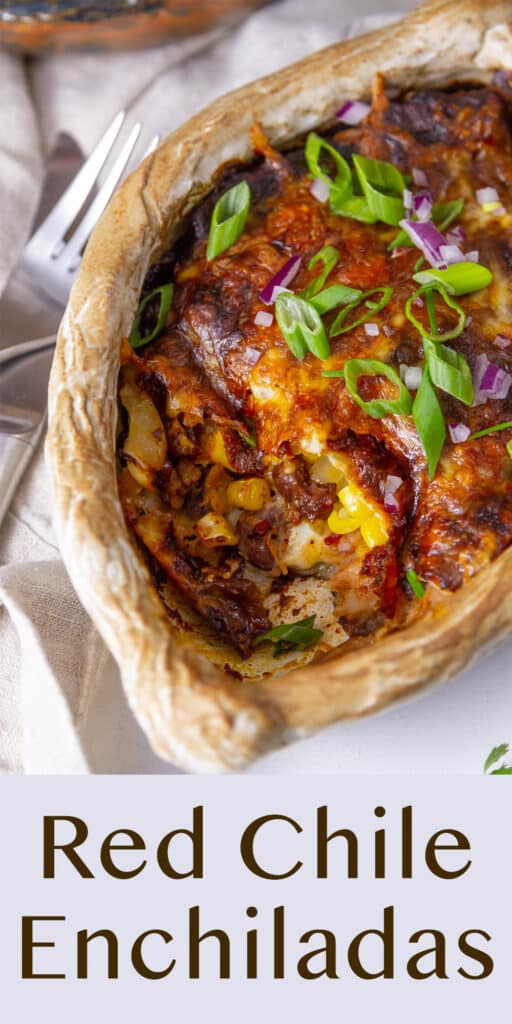
Sprinkle with green onions. Top with sour cream and sliced avocados. Serve additional red chile sauce on the side.

What to Serve with Enchiladas
Serve this delicious vegetarian main dish with Chipotle Seasoned Rice like you see in the picture. Or serve some cilantro lime rice and black beans on the side.
Serve the enchiladas with some homemade tortilla chips and guacamole or with a nice crisp green salad.
And don’t forget dessert! This Flan Recipe is perfect!

Variations on the recipe
As for variations, you could add sweet red or yellow pepper to boost the vegetable content.
I love spinach in my enchiladas. Use some frozen spinach that you’ve drained really well in the layers.
Zucchini would be another great veggie addition, especially in the summer when the squash is super abundant!
I just love stacked enchiladas, if you do too, be sure to check out my recipe for Stacked Vegetable Black Bean Enchiladas.
You can make fantastic enchiladas with leftover veggies and stale tortillas too! Making these super budget friendly!
And, of course you can use canned or jarred enchilada sauce to save time.
Individual servings
I really like the individual serving presentation of these enchiladas, and I think this comfort food dish will be great for a big family dinner.
I love the rustic look of the individual serving size & your dishes don’t have to match – that’s part of the fun!
Vegetarian or not, everyone will love these!
Or make it family style
This can be made as a larger family style meal as well.
Simply use a 9 x 13-inch baking dish, spreading one-third of sauce over bottom; top with one-third of tortillas, the beans, one-third of cheese, one-third of tortillas, the vegetable mixture, remaining tortillas, remaining sauce, and remaining cheese.
Who needs take-out when you can make a delicious Red Chile Enchiladas casserole from scratch? It’s a vegetarian main dish that’s layered and so easy to make. And this dish is Budget friendly too!
Can I make these ahead?
Make the red enchilada sauce up to a week in advance. Or store leftovers for a week in the fridge.
The individual dishes can be made ahead of time and kept in the fridge. Take them out & pop them in the oven right before it’s time to eat.
Freeze them for up to a month (thaw in the fridge before heating).
Leftovers can be easily reheated in the microwave.
Want More Enchilada Recipes?
- Sweet potato black bean enchiladas
- Green chickpea enchiladas
- Shrimp & crab enchiladas
- Quick black bean enchiladas
- Creamy verde fiesta enchiladas
- Tuna enchiladas
Let’s connect
If you like seeing my recipes subscribe via email in the upper right.
Or, connect with me on your favorite social media channel for recipes, photos, & much more:
Pinterest, Facebook, Instagram, YouTube and Twitter!
And find my shop on Amazon for recommendations on cool tools
If you try this recipe,
please come back & leave a comment below letting us know how it goes.
Share a picture & tag @lifecurrents on Instagram.
Or you can upload a “tried it” photo (I would love to see)
via the pin.
Vegetarian red chile enchiladas recipe

Red Chile Enchiladas
Ingredients
Red Chile Sauce:
- 6-8 whole dried red chiles hard stems removed
- 2 tablespoons light tasting oil of your choice
- 2 tablespoons finely diced red onion
- 1 garlic clove finely chopped
- 1 teaspoon dried oregano
- 2 tablespoons all-purpose flour
- ½ teaspoon ground cumin
- 2 ½ cups water
- 1 teaspoon salt
Enchiladas:
- 1 tablespoon vegetable oil
- ½ yellow onion sliced
- 1 cup frozen corn
- 1 recipe red chile sauce
- 9 corn tortillas quartered
- 1 cup refried beans
- 1 cup black beans drained and rinsed
- 1 cup plus 2 tablespoons shredded pepper jack cheese
- 6 tablespoons chopped green onions
Instructions
Make the red chile sauce:
- Place whole chiles in the bowl of a small food processor or in a spice grinder. Grind until chiles are finely chopped and uniform in size. Ground chiles should measure ½ cup. If you don’t have ½ cup, grind remaining chiles as needed.6-8 whole dried red chiles
- Heat the oil in a heavy saucepan over medium-high heat. Add onion and cook until it begins to brown, about 5-10 minutes, stirring occasionally. Add garlic and oregano and continue to cook for another minute until garlic becomes fragrant.2 tablespoons light tasting oil of your choice, 2 tablespoons finely diced red onion , 1 garlic clove , 1 teaspoon dried oregano
- Add the flour and cumin and cook for at least 2 minutes, stirring constantly. The flour will brown slightly. Whisk the ground chile and the water into the roux. Stir as the sauce thickens, then lower the heat and simmer, stirring occasionally for 15 minutes. Season with salt.2 tablespoons all-purpose flour, ½ teaspoon ground cumin, 2 ½ cups water, 1 teaspoon salt
- Sauce can be strained at this point to create a silky smooth red chile sauce, or it can be used as a rustic red sauce and not strained.
Enchiladas:
- Preheat oven to 375°. Heat oil in a large frying pan over medium heat. Add onion and cook until translucent, about 4 minutes. Add corn and cook until hot. Set aside.1 tablespoon vegetable oil, ½ yellow onion , 1 cup frozen corn
- Put 6 ovenproof baking dishes (each about 12-oz. capacity) on a rimmed baking sheet. Working with one dish at a time, spoon in 2 tablespoons enchilada sauce. Top with 2 tortilla quarters, 2 rounded tablespoons each refried beans and black beans, 1 tablespoons cheese, and 2 more tortilla quarters, pushing tortillas down gently as you layer them over cheese and beans. Spoon in 1/3 cup (packed) vegetable mixture, then 2 more tortilla quarters, 3 tablespoons enchilada sauce, and 2 tablespoons cheese. Repeat layering with remaining dishes.1 recipe red chile sauce, 9 corn tortillas , 1 cup refried beans, 1 cup black beans , 1 cup plus 2 tablespoons shredded pepper jack cheese
- Bake enchiladas until bubbling, cheese is melted, and tortillas are starting to brown on edges, about 30 minutes. Sprinkle with green onions.6 tablespoons chopped green onions
Video
Nutrition
Nutritional information is based on third-party calculations, and should be considered estimates. Actual nutritional content will vary based on brands used, measuring methods, portion sizes, and more.


Cindi
I just want to know if you were to can your Red Chile , how long and which type. WB or PC. Thanks in advance, Love Love Punk Domestics.
Debi
If you’re going to can it, I’d recommend making a double batch, because we eat it so quickly around here! 😉
But, according to the USDA https://nchfp.uga.edu/ 35 minutes in a dial-gauge pressure canner. Check the table on that USDA site for more info – there’s tons more there. Thanks for the comment.
Debi
This is amazing! I am so glad I made these for dinner this week. Fed the whole family plus leftovers!
Joanne T Ferguson (@mickeydownunder)
G’day! This is delicious! Easy to make, though I used tinned sauce. Great hearty food.
Cheers! Joanne